Monday, 27 June 2011

The Institute of Cute, Byron Bay (and a giveaway!)


I often get asked about the reasoning behind the name of my blog. People as: Why Diary of a Ladybird? My response is always pretty straightforward - I just love ladybirds.. I always have!

And so given my 'mild obsession', as I call it, it was only common sense that whilst in Byron Bay that I visited The Institute of Cute, often referred to as 'the ladybird shop' by those who have visited it previously. I had heard about this concept store and gallery from a friend last year and was very much looking forward to visiting during my recent trip.


The store and gallery opened in 2007 is the creation of Jane Davenport, a multi-award winning photographic artist and designer with a passion for ladybirds! As Chief Artomologist, Jane's mission is to "create cute and FUNctional design and artwork to make you dream". If you ask me, she is most certainly succeeding in her mission - I was simply blown away by the store!

The front of the store is filled with all sorts of ladybird and bug paraphenalia - clothing, jewellery, placemat sets, pens, toothbrush guards, you name it, it's there - and all designed by Jane herself. Without doubt, I was in ladybird heaven! I hope you can get an idea of what is what like by these pictures...


And towards the back of the store, a beautiful gallery feauturing Jane's latests works, prints and books, as well as art supplies.


So if you're ever in Byron Bay, do stop by and check out The Instiute of Cute - it's worth a visit! Until then, why not check out the website.

And without further delay, it's GIVEAWAY time!
Thanks to Jane Davenport and The Institute of Cute in Byron Bay, one lucky Diary of a Ladybird reader has the chance to win this lovely gift set from the store, including a fold away ladybird bag, ladybird monitor cleaner and signed copy of Jane's book Ladybird Ladybird.


To enter, all you had to do is leave a comment telling me why you love ladybirds (and I'm premusing you do of course!). Then, email me a copy of your comment along with your full name and postal address to: diaryofaladybird[at]gmail[dot]com.

Entries close on Sunday, July 10. This competition is restricted to Australian residents only (sorry!).

This competition has now closed. Congratulations to The InTolerant Chef!

Good luck!

Ladybird x

The Institute of Cute
58 Jonson St, Byron Bay
(02) 6880 8550
http://instituteofcute.com.au/

Sunday, 26 June 2011

Roasted tomato and thyme soup


There's nothing like a nice tomato soup in winter, and this recipe from the latest issue of Donna Hay is definitely a keeper - fast, simple and healthy, not to mention absolutely delicious!

Roasted tomato and thyme soup
Adapted recipe from Donna Hay magazine, June/July 2011

Ingredients
4 cloves garlic, peeled and crushed under a knife
2 red onions, sliced
10 tomatoes, halved and deseeded (I used roma tomatoes)
1 tablespoon fresh thyme leaves
1 tablespoon tomato paste
3 cups vegetable stock
olive oil
salt and pepper

Method
1. Place tomatoes, garlic, onions and thyme on a baking tray. Drizzle with olive oil and season with salt and pepper. Roast in a preheated oven at 180 degrees celcius for 30 minutes.


2. Heat stock and tomato paste in a pot. Add the roasted tomatoes mixture and bring to the boil. Remove from heat, and blend until smooth. Top with a little extra pepper.

3. Serve with toast spread with goat's cheese and topped with a few thyme leaves and a little olive oil.


Bon appetit!

Ladybird x

Friday, 24 June 2011

Harvest Café & The Byron at Byron Restaurant, Byron Bay

Last week I travelled to Byron Bay in northern New South Wales with Mr Ladybird and my in-laws for a short break. Byron Bay is located in northern New South Wales, and is only around 2 hours drive from Brisbane. A few years ago when we still lived in Brisbane, driving down to Byron Bay for a night or two was something I would look forward to tremendously, and since relocating to Sydney I have missed that convenience a lot. With recent flooding on the Pacific Highway, our drive from Sydney to Byron Bay ended up taking almost 13 hours... but it was worth it.

It was so lovely to visit Byron Bay again, and (don't tell anyone) but I think winter is the perfect time to visit the area. Blue skies, sunshine and warmer temperatures, less crowds, not to mention the beautiful landscape - stunning beaches, pristine forest and the breathtaking hinterland - there's a reason why you feel great after visiting such a pristine part of the world.

Byron Bay is also a great place for foodies to visit thanks to the great array of eateries offering the best of local produce. I'll be posting more on the food on offer at Byron Bay, but first here is a little look into two places I visited during my stay.

First, Harvest Café, which is located in Newrybar in the Byron Bay hinterland. This cafe is situated in a renovated house with sweeping balconies, and boasts a beautiful ambiance.


Sitting outside on the balcony under heaters was nice, and there is also seating available indoors.


I just loved the look of the sofas by the fireplace - so cosy...


We visited Harvest for breakfast on the weekend. We were keen to dine somewhere outside of town, and outside of Bangalow, so Harvest seemed like a good option. We started with coffees - a cappuccino ($3.85) and a latte ($3.85).

Wednesday, 22 June 2011

Pani Puri

Have you ever heard of pani puri?

Pani puri is a popular bite-sized street snack sold by vendors across India, but is also enjoyed in many Indian homes. Crispy deep-fried spheres called puris are tapped open slightly before being filled with a savoury filling and chutney, then quickly dunked in a flavoured water (pani) before being devoured in one mouthful while still crisp. Sometimes sev (a crumbled vermicelli type product) is also sprinkled over the puris before they are eaten.

There are as may variations of pani puri as there are regions of India. People go mad for pani puri in India! I myself have never had it from street vendors in India due to health precautions whilst travelling, however, I have had the pleasure of enjoying it at home with My Ladybird's family on a few occasions. I think this is how it's enjoyed best - a big group of people sitting around the table chatting and busily tapping away at the puris, filling them one by one, devouring them one after the other... I myself can only manage around 10 at the most, but others (*ahem* Mr Ladybird) can just keep going and going!

As Mr Ladybird's family hail from Gujarat, they typically enjoy pani puri in the Gujarati style. I took some pictures of a recent pani puri get together to share with you all. So this is not a recipe post as such, but more of a show and tell, if I may :)

Here are the small puri I mentioned...


And here are the key fillings. At the front - a tangy mixture of cooked potato and boiled dark chickpeas tossed through a spice mixture. To the left, the sweet chutney made from dried mango. And to the back, the wonderfully green water made with loads of fresh mint, fresh coriander and a few other secret ingredients.


Here, my mum-in-law demonstrates how you put each puri together. Here she fills the puri with the potato/chickpea mixture, followed by the chutney...

The pani is then quickly spooned over (or you can dunk it directly into the water)... and down the hatch!

Keen to check out a pani puri recipe? As a starting point, check out this link:


Finally, a quick GIVEAWAY REMINDER for you all. My latest Bakers Delight giveaway is closing this Friday, June 24 so don't forget to enter for your chance to win one of five $5 Bakers Delight vouchers. To enter, click here and follow the instructions: http://diaryofaladybird.blogspot.com/2011/06/flavoured-scones-bakers-delight.html

Stay tuned for upcoming posts on my recent trip to the beautiful Byron Bay - there will also be more giveaways to be won! Oh, how I love giveaways :)


Ladybird x

Saturday, 18 June 2011

How to make an eggless cake


Actually... let me make that - How to make a good eggless cake!

My mission to find a good, basic eggless cake recipe goes back years. Many of Mr Ladybird's family don't eat eggs, and as an avid baker I have always been on the lookout for baked goodies that they can enjoy without eggs, but without sacrificing on flavour and texture. I can't tell you how many eggless cake recipes I've tried in the past only to be disappointed by sometimes bad/sometimes mediochre results. It is quite a challenge to create a tasty eggless cake that exhibits all the qualities you'd expect of a nice cake - good flavour, texture, height and crumb. I thought it an impossible task - until now! The result is a little denser than your average cake, but certainly a good result nonetheless...


Last week I came across a basic eggless cake recipe that struck me as being a little different to those I'd trialled in the past. Unlike others that included vinegar, yoghurt, egg replacement powders and a myriad of other ingredients, this one was a little different. The secret ingredient...?

Sweetened condensed milk!


I was so pleased with the result that I knew I had to share this recipe with you straight away. This recipe is one I've slightly adapted from a fantastic blog I've found called Divine Taste - well written posts with great recipes, and always accompanied by beautiful food photography.

This is a useful recipe to know in case you ever need to make an eggless cake - be it because of someone's allergy, personal preference, or even if it's because you don't have any eggs left in your kitchen! Using a good quality vanilla extract makes all the difference here - so please don't use the artifical stuff (i.e. vanilla essence) if you can avoid it. It is well worth paying a little more for real extract. You can get creative with this recipe too. You could even adjust the baking time and use the batter to make eggless cupcakes. This time around I simply cut it into 2 layers and sandwiched it with warmed strawberry jam and whipped cream before showering the top with icing sugar.


Basic Eggless Cake
Recipe adapted from Divine Taste

250g plain flour
2 tsp baking powder
1 tsp baking soda / sodium bicarbonate
1 tin (395g) sweetened condensed milk
100g unsalted butter, melted
175ml milk/water (I used 175ml low fat milk)
2 tsp vanilla extract

1. Grease and line the bottom of a 20cm round cake tin with baking paper. Preheat your oven to 100-120 degrees celcuis.

2. Sift the flour, baking powder and sodium bicarb into a bowl and whisk to combine and ensure the mixture is uniform.

3. Add the condensed milk, melted butter, vanilla essence and milk/water into the mixing bowl containing the dry ingredients one at a time, using an electric hand mixer, whisk or spoon to mix until the batter comes together and there are no lumps. This shouldn’t take more than a minute with an electric hand mixer/beater. Be careful not to over beat the mixture as this could result into a hard cake.

4. Inrease your oven temperature to 150 degrees celcuis and pour the batter into the cake tin and bake for
50 - 60 minutes, or until a skewer inserted into the middle of the cake comes out clean. Transfer the cake to a cooling rack and use as required.


Have you ever tried making eggless cakes? If you know of any good recipes, why not share your links here!


Ladybird x

PS - I thought I might also mention that I had a media mention on a UK news site earlier this month! You can read the full article here.

Wednesday, 15 June 2011

Celebratory grazing at Rubyos, Newtown


Last week I had the pleasure of dining at Rubyos in Newtown with my sister, 'Coco', and Mr Ladybird. It's not often that I get to see my dear sister and it was as a belated birthday celebration for her that we headed to Newtown on a blustery and cold Sydney evening last week.

You may recall my previous post on Rubyos last year, when I covered a fantastic degustation brunch there (to read this post, click here). Given this positive experience, I had high hopes for our dinner, and we weren't disappointed. As always, the ambiance was lovely, and I never cease to admire the restaurant's artwork...


The Rubyos menu offers a vast and tantalising selection of tasting dishes that are best shared by a table. This is my favourite way to enjoy food - a variety shared with loved ones ... not to mention the fact that it is a wonderful way to avoid what I like to call 'order envy' ;) There are plenty of options for vegetarians and vegans which is fantastic, but there are plenty of options for the carnivores too, including a star anise braised pork belly dish for all you pork belly fanatics!

First we start with some breads with the 'Double dipper' - Turkish bread toasts with the chef's dips of the day - a delicious pesto and hummus style dip ($8.50).


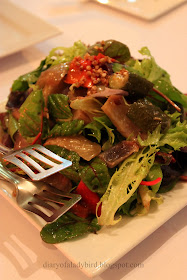
The dishes then come out progressively, starting with the lighter ones first. We start with the Salad of grilled autumn vegetables topped with mesculin, toasted buckwheat, and a lemon and sage vinaigrette ($14.50)


Next, the Panfried haloumi topped with watermelon, coriander and mint salsa, and chilli oil drizzle ($16.50). What an unexpectedly fabulous combination - a real highlight.


Cumin dusted tofu topped with chimmichurri sauce and an amarillo pepper salsa ($15.50)


For Coco, the Rosettes of atlantic salmon glazed with fennel and pinenut pesto, with a wild rocket, shaved fennel and sundried tomato salad ($25)


Lightly steamed green beans with a burnt orange and black olive dressing ($11.50)


And one of my favourites of the evening - the Crispy New York style crushed chats tossed through fresh herbs and seasoned salt ($9.50). Sooo delicious, I could happily eat these bad boys every day...


The 'bump' and I champion the dessert cause, and I enjoy the Pecan and chunky green apple pudding with rum and raisin ice cream and maple caramel ($13.50). A delicious warm and soft pudding - ideal on a cold winter's night, and great ice cream (as close as I'm going to come to a drink for a few months yet!)


Mr Ladybird and Coco opt for some hot drinks to finish instead - a mocha ($4.50) and a hot chocolate ($4.50) ...


All in all a great meal at considerably good value for the quality of food and the overall experience. A nice venue for celebrating a special occasion such as a birthday or anniversary. And the service? Attentive, friendly and efficient by Liz and the team. I definitely recommend the Rubyos grazing experience to others.


Rubyos
18-20 King Street, Newtown
(02) 9557 2689
http://www.rubyos.com.au/

Rubyos on Urbanspoon

Ladybird x

Sunday, 12 June 2011

Salted caramel, peanut and chocolate tarts


We all know that the food world is overflowing with professional talent - for amateurs such as myself, there is plenty of inspiration to be found out there, and I take great pleasure in immersing myself in cooking TV shows, books and magazines. It's something I never tire of.. So, in a way, I think you'll agree with me when I say that it can be quite easy to spend much your actual time in the kitchen following others' recipes rather than trusting your own instincts. And perhaps sometimes, recipes can become a little bit of a crutch when you get into the habit of using them all the time. I have been thinking about this a lot of late, and have realised that this over-reliance on recipes is in part a  symptom and a cause of my lack of confidence in the kitchen. Sure, I've baked and baked for many years, but it is quite rare that I set about creating something entirely of my own invention.

And so it was very timely that I heard about the Lurpak Challenge calling for submissions of original recipes incorporating the iconic butter (I just know you've heard me rave about this product before, so I'll spare you the repetition!). With the added incentive of great prizes at stake, I decided to take a leap of faith in my baking. I lifted my hand from the safety railing, put away all the recipes, and step by step, created something I can call my own. It was a little scary at first, and there were mistakes.. oh yes, and mistakes involving caramel are rather sticky and a pain to clean up... but after three attempts I think I've managed to create something worthy of entry into the competition (I hope!)

Here is my recipe for salted caramel, peanut and chocolate tarts. This recipe combines three things that I absolutely can't live without eating now and then - sweet shortcrust pastry, salted caramel and chocolate. The salted peanuts add a great crunch too. This recipe makes ten 8cm tarts, however, you can easily adapt the method to make one larger 22-24cm tart.


Ingredients

Pastry
250g plain flour
50g icing sugar
pinch salt
150g unsalted butter, cold and chopped into chunks
iced water

Peanut & Salted Caramel filling
1 cup white sugar
70g Lurpak unsalted butter
1/3 cup thickened cream
1/4 teaspoon sea salt flakes
1/4 cup salted peanuts, chopped

Chocolate ganache
1/2 cup thickened cream
110g dark chocolate (70% cocoa), finely chopped
90g milk chocolate, finely chopped


Method

1. Start with the pastry by adding the plain flour, icing sugar, pinch of salt and 150 grams of butter (cold and roughly chopped into chunks) and pulse until breadcrumbs start to form. Add around 3 tablespoons of ice-cold water, one tablespoon at a time, until the dough starts to come together. Tip the mixture out onto a clean work surface and gently bring together with your hands. Wrap with clingfilm and refrigerate until ready for use.


2. To make the salted caramel, place the white sugar and a few tablespoons of water in a heavy based saucepan over medium heat. Stir to dissolve the sugar, which will then start to form white lumps. At this point, reduce to low heat and stir regularly as the sugar begins to caramelise and darken. As soon as it reaches a golden-amber colour, remove from the heat immediately and stir in the remaining 70g of butter, 1/3 cup of thickened cream and the salt flakes. Take care doing so as it will spit and splutter. Once smooth, transfer to a bowl/jug to cool.


3. Next, preheat your oven to 200 degrees celcius and start on your pastry cases by lightly greasing ten 8cm loose-based tart tins. Roll out the pastry on a lightly floured surface to around 3mm. Cut out 10cm rounds and fold the pastry into the cases, gently pressing the pastry into the grooves. Prick the base of each with a fork and transfer to the freezer for at least 10 minutes. Line each tin with baking paper or foil then fill with pastry weights or dried beans/rice and blind- bake for around 10-15 minutes. Remove the paper/foil and weights and bake for a further 5-10 minutes or until golden brown. Remove from oven and allow to cool in tins.


4. Divide the chopped peanuts between the tart cases and pour over the salted caramel. Place in fridge to set.


5. Meanwhile, to make the ganache heat 1/2 cup of cream in a small saucepan until it is about to boil. Remove from the heat and stir through the chocolate. Allow to cool slightly before diving among the peanut and caramel filled tart cases, then return to the fridge to set.


So there you have it - my original recipe for salted caramel, peanut and chocolate tarts. If you like what you see please, pretty please, vote for me in the Lurpak Challenge! To vote, go to: http://www.lurpak.com.au/lurpakchallenge/recipe/salted-caramel-peanut-and-chocolate-tarts and register your vote.


Till next time, dear readers

Ladybird x