Showing posts with label fruit. Show all posts

Friday, 20 April 2012

Classic Banana Bread


Good afternoon!

Here is the third recipe I am sharing from this month's Cookbook of the Month, 'The Sweet Life' by Kate Bracks. Yes, this is another basic recipe, but that is what I am loving about this book. Each chapter of the book is divided into two sections: The basics; and, Beyond the basics. Sometimes something simple is all you want, and it's recipes like these that I feel are the litmus test to a cookbook.

Ahhh the simple things.. a good banana bread would definitely be among them, but here are my top ten favourite simple things (in no particular order) :

1. A hot shower
2. A good cup of coffee
3. A warm hug
4. Clean bed sheets
5. My pillow
6. A good night's sleep
7. The smell that fills the house when something is baking
8. My baby's smile
9. Putting my feet up at the end of a long day
10. A nice glass of wine

Out of everything on this list, the one thing that eludes me most is a good night's sleep. We're pretty sure The Emperor is teething now as we can feel a sharp little gnasher starting to poke through his lower gums, so the poor guy is obviously in quite a bit of discomfort. This means frequent night waking and not much sleep for Mummy dearest... Who knows when the day will come that I get a full night's rest again, I have almost forgotten what it feels like it's been so long. But when it does come, it will be so utterly, utterly delicious!


American Banana Bread with Walnuts
Recipe from 'The Sweet Life' by Kate Bracks


Ingredients

100g regular (i.e salted) butter, at room temperature, chopped
220g (1 cup) caster sugar
2 eggs
2 very ripe large bananas, mashed
1 tsp vanilla extract
300g (2 cups) self-raising flour
60ml (1/4 cup) buttermilk (or milk with a squeeze of lemon juice)
50g (1/2 cup) walnuts, chopped*
*Simply omit if you're not a fan of walnuts in your banana bread

Method


1. Preheat oven to 160 degrees celcius. Grease a 21cm x 10cm (base measurement) loaf tin and line the base with baking paper, extending over the two long sides.

2. Use electric beaters to cream the butter and sugar until pale. Add the eggs one at a time, beating well after each addition. Mix in the mashed banana and vanilla extract. Sift the flour into the mixture. Add the buttermilk, and fold through until thoroughly combined. Stir through the walnuts.

3. Spoon into the loaf tin, and bake for 55 minutes, or until a skewer inserted in the centre comes out clean. Cool in the tin for 10 minutes, then turn out onto a wire rack to cool completely.


This is a great classic banana bread recipe. So after testing three of her basic recipes I'm happy to give all three the thumbs up, and I look forward to trying out some of the 'Beyond the basics' recipes soon. Stay tuned!


Ladybird xxx

Monday, 15 August 2011

RSPCA Cupcake Day 2011


Today was my third year of participation in the RSPCA Cupcake Day, and it was a success once again... Thanks to the support of my family, friends and colleagues I raised $360 for the RSPCA! Hurrah, and a big thank you to everyone for their support of this wonderful cause :)

Vanilla cupcake with vanilla buttercream


This year I decided to keep my cupcakes simple, but no less delicious. I made my usual favourite chocolate cupcakes topped with ganache, as well as something new - a lovely Nutella cupcake which went down a treat with my fellow Nutella-addict friends. The recipe comes from this The Crabapple Bakery Cupcake Cookbook - if you are keen for me to do a post on this recipe, please let me know!

'Nutella Lovers' cupcake

I also offered vanilla cupcakes with four different butter cream flavours - vanilla, strawberry, lavender and passionfruit. And because I'm not at all a fan of essences (oh don't even get me started!), I used all natural ingredients to create scrummy flavours. My favourite of the four was the strawberry buttercream - Mmmmm!

Vanilla cupcake with lavender buttercream

Vanilla cupcake with passionfruit buttercream

Vanilla cupcake with strawberry buttercream

Here is my recipe for you, my lovely readers...

Ladybird's Strawberry Buttercream (enough to generously top a dozen cupcakes)

an original Diary of a Ladybird recipe

125g unsalted butter, at room temperature
pinch of salt
2 cups icing sugar
1 teaspoon vanilla extract
250g punnet strawberries, washed and hulled
2 tablespoons caster sugar, plus extra to taste
1 tablespoon lemon juice, plus extra to taste
pink food colouring (optional)

1. First start on the strawberry syrup that will flavour the buttercream. Blitz the strawberries to a fine puree. Combine in a a small saucepan along with the caster sugar and lemon juice. Stirring occasionally, bring to a simmer over low-medium heat. Reduce to low heat and stir frequently until the liquid has reduced to a thick syrup. Taste as you go, adding more lemon juice / caster sugar as required. Pass the syrup through a fine sieve and set aside in the fridge to cool.

2. Now start on the buttercream. Using an electric mixer, beat together the butter, vanilla extract and pinch of salt for a minute. Then beat in the icing sugar a third at a time, mixing well and scraping down the bowl after each addition to keep the mixture light and fluffy.

3. Finally, mix in the cooled strawberry syrup until well combined. If the mixture is a little wet for spreading/piping, simply add extra icing sugar. At this point you could also add a little pink food colouring if you wanted to enhance the colour, but I find that the syrup itself gives colours the buttercream nicely.


Till next time, dear readers

Ladybird x

Thursday, 2 June 2011

Best Ever Blueberry Muffins


There are blueberry muffins, and then there are blueberry muffins. I have tried so many blueberry muffin recipes where the result has never quite hit the mark.. and then I gave up for a while. Then I saw Donna Hay making these on Tuesday night's episode of Fast, Fresh, Simple that airs on Lifestyle Food on Tuesday nights at 8:30pm. I tried them yesterday evening and they most certainly did not disappoint - perfectly fluffy on the inside and deliciously crunchy on top.

Apart from the taste factor, these are so quick and easy to make. What's best of all is that this is a great basic recipe that you can get creative with. Enjoy the recipe as it is, or mix it up however you please! Here are just a few ideas of additions that could be made to the recipe:
  • chopped almonds on top for extra flavour and crunch
  • lemon zest - I love love love blueberries paired with lemon
  • chopped apple in the mixture - apple and blueberry are lovely together
  • pieces of mango or peach along with a little coconut on top during summer months

With punnets of blueberries fetching $12 a punnet at the moment in most supermarkets these days, I opted for frozen rather than fresh. By the way, is that what they mean on those supermarket commercials when they say prices are firm..? i.e. that they are exorbitantly expensive? At any rate, not only are frozen ones cheaper but you can keep a stash of them in the freezer and whip up muffins like these whenever you want, making availablity in your home firm - that's this week's kitchen update!

Blueberry Muffins
Recipe by Donna Hay
(makes 12)

Ingredients

2½ cups (375g) self-raising flour, sifted
1 teaspoon baking powder
1 cup (220g) caster sugar
½ cup (125ml) vegetable oil
1 egg
½ cup (125ml) milk
1 teaspoon vanilla extract
300g fresh or frozen blueberries
granulated sugar, for sprinkling

Method

1. Preheat oven to 180°C (350°F).
2. Place the flour, baking powder and sugar in a bowl. Place the oil, egg, milk and vanilla in a separate bowl and whisk to combine.
3. Pour the liquid ingredients into the dry ingredients and mix until just combined. Add the blueberries and mix to combine.


4. Spoon mixture into a 12-hole ½-cup capacity (125ml) muffin tin lined with paper patty cases. Sprinkle the tops with sugar and bake for 30–35 minutes or until cooked when tested with a skewer. Remove from tin and cool on a wire rack.


Tell me, my dear readers, how would you would put your own stamp on this recipe?

Ladybird x

Sunday, 29 May 2011

Classic Apple Pie and Custard


With cooler weather setting in, there is such delight in tucking into classic winter dishes like homemade apple pie and custard... classic comfort food! It feels good and there's nothing pretencious about it...just like a big warm hug :)

I made this pie and custard to bring to our friends' place for a dinner party over the weekend. The two components are surprising easy to make at home - it makes me wonder why I ever bought apple pie from the freezer section. As for homemade custard, there really is no comparison to the gelatinous yellow goop out of the carton from supermarkets - where's the comfort in that?!


Apple Pie
Recipe adapted from Donna Hay

1 quantity sweet shortcut pastry (see recipe below)
1 egg, lightly beaten
sugar for sprinkling (optional)
8 green apples (1.2kg/2lb 7oz), peeled and chopped
1 tbsp water
1/3 cup granulated sugar
1 tbsp lemon juice
1/2 tsp ground cinnamon
2 tbsp almond meal

1. Preheat the oven to 190 deg C (375 deg F). To make the filling, place the apples and water in a deep frying pan over medium heat. Cover and simmer, stirring the apples occasionally, for 5 minutes or until just tender. Drain and cool completely.


2. Stir in the sugar, lemon juice and cinnamon.


3. Divide the pastry into two-thirds and one-third. Roll out the two-thirds portion on a lightly floured surface until 3mm (1/8 in) thick and place in a shallow 24cm (9 1/2 in) pie tin. Sprinkle over the almond meal and pack the apples tightly into the pastry shell.


4. Roll out the remaining pastry to fit over the top of the pie. Brush the rim with water, press the edges together and trim. Cut several slits in the top of the pastry, brush with the egg and sprinkle with sugar (optional). Bake for 30 minutes or until the pastry is golden and crisp.


Sweet Shortcrust Pastry
2 cups plain (all-purpose) flour
3 tbsp caster (superfine) sugar
150g (5 oz) cold butter, chopped
around 2-3 tbsp iced water

1. Process the flour, sugar and butter in a food processor until the mixture resembles fine breadcrumbs.
 

2. While the motor is running, add enough iced water to form a smooth dough and process until just combined.
 
 
3. Tip onto clean work surface and knead the dough together lightly.
4. Wrap in plastic wrap and refrigerate for 30 minutes.
 
Classic Custard
an original Diary of a Ladybird recipe
 
600ml pure cream
1 vanilla bean (or 1 tsp quality vanilla bean paste)
6 egg yolks
70g caster sugar
1 tbsp cornflour
 
1. Place the scraped vanilla bean and seeds in a medium size saucepan along with the cream. Heat until just before boiling point and remove from the heat.
2. Meanwhile, in a large bowl, whisk together the egg yolks, sugar and cornflour until thick and creamy.
 
 
3. Whisking continuously pour the cream into the egg and sugar mixture and then return the mixture to the suacepan.
4. Stir over low heat until thick enough to coat the back of a spoon. Remove from the heat and transfer into a bowl though a sieve. Squeeze excess custard off the split bean and return to the custard to allow the vanilla to infuse further.
 
 
5. Serve immediately; or if not, cover with clingflim as pictured below and refrigerate until serving time. Refrigeration with prevent the custard from cooking further.
 
 
Put the two together and tuck in! I just love the combination of pie fresh out of the oven and cool custard - simply delicious!
 
 
So when you think winter comfort food, what's on the menu for you?
 
Till next time,
Ladybird x

Friday, 7 January 2011

Orange, cardamom and almond cake with orange-blossom yoghurt


The orange and almond cake is one of my all-time favourites and when I came across this old GT recipe, I just knew I had to give it a try. It was quite a while ago that I discovered it, and stuffed the recipe away in my folder that I fondly refer to as 'those recipes I'd like to get around to making... some day'. With a fresh year ahead of me, it seemed only timely that I conquer procrastination in the kitchen and get on with some of these recipes :)

Orange, cardamom and almond cake with orange-blossom yoghurt
Recipe from Gourmet Traveller (December 2009/January 2010 issue)

Ingredients
2 oranges, washed
250g caster sugar
1/2 tsp ground cardamom
pinch of ground cinnamon
300g blanched almonds, finely ground in a food processor (I used store bought almond meal instead)
1 tsp baking powder
5 eggs
Puring icing sugar, for dusting

Orange-blossom yoghurt
150g thick natural yoghurt
20g pure icing sugar
1-2 tsp orange blossom water, to taste

Method

1. Place oranges in a large saucepan, cover completely with cold water and bring to the boil over high heat. Cover with baking paper and a plate to weigh the oranges down, then cook until oranges are soft (2 to 2.5 hours). You may need to top up with extra water to keep oranges covered. Drain, cool, then remove and discard calyx and seeds from oranges and coarsely chop.


2. Preheat oven to 180 degrees celsius. Process oranges, sugar and spices in a food processor until finely chopped. Transfer to a bowl, add almonds and baking powder and set aside.


3. Meanwhile, whisk eggs in an electric mixer until pale (3-5 minutes), add orange mixture and whisk to combine (10-20 seconds). Pour into a buttered and baking paper-lined 22cm springform pan and bake for around 50 minutes until golden and an inserted skewer withdraws clean Cool on a wire rack for 5 minutes, then release sides of pan and cool completely.


4. Meanwhile, for the orange-blossom yoghurt, combine ingredients in a bowl and refrigerate until required.

5. Dust the cake with icing sugar and serve with the yoghurt.


This cake is incredibly moist... the texture is sublime! The flavour of the spices is so delicate and doesn't distracting from the orange flavour - they just add a nice little twist on a classic. For me, I could quite happily eat this cake on its own without the yoghurt as I was not a big fan of it as a side. Next time I make this, I think I'll sprinkle some chopped pistachios over the cake and serve it with creme fraiche in place of the orange-blossom. But before then, I have a heck of a lot of other recipes to share with you, so I had better get cracking!

Ladybird x

Monday, 3 January 2011

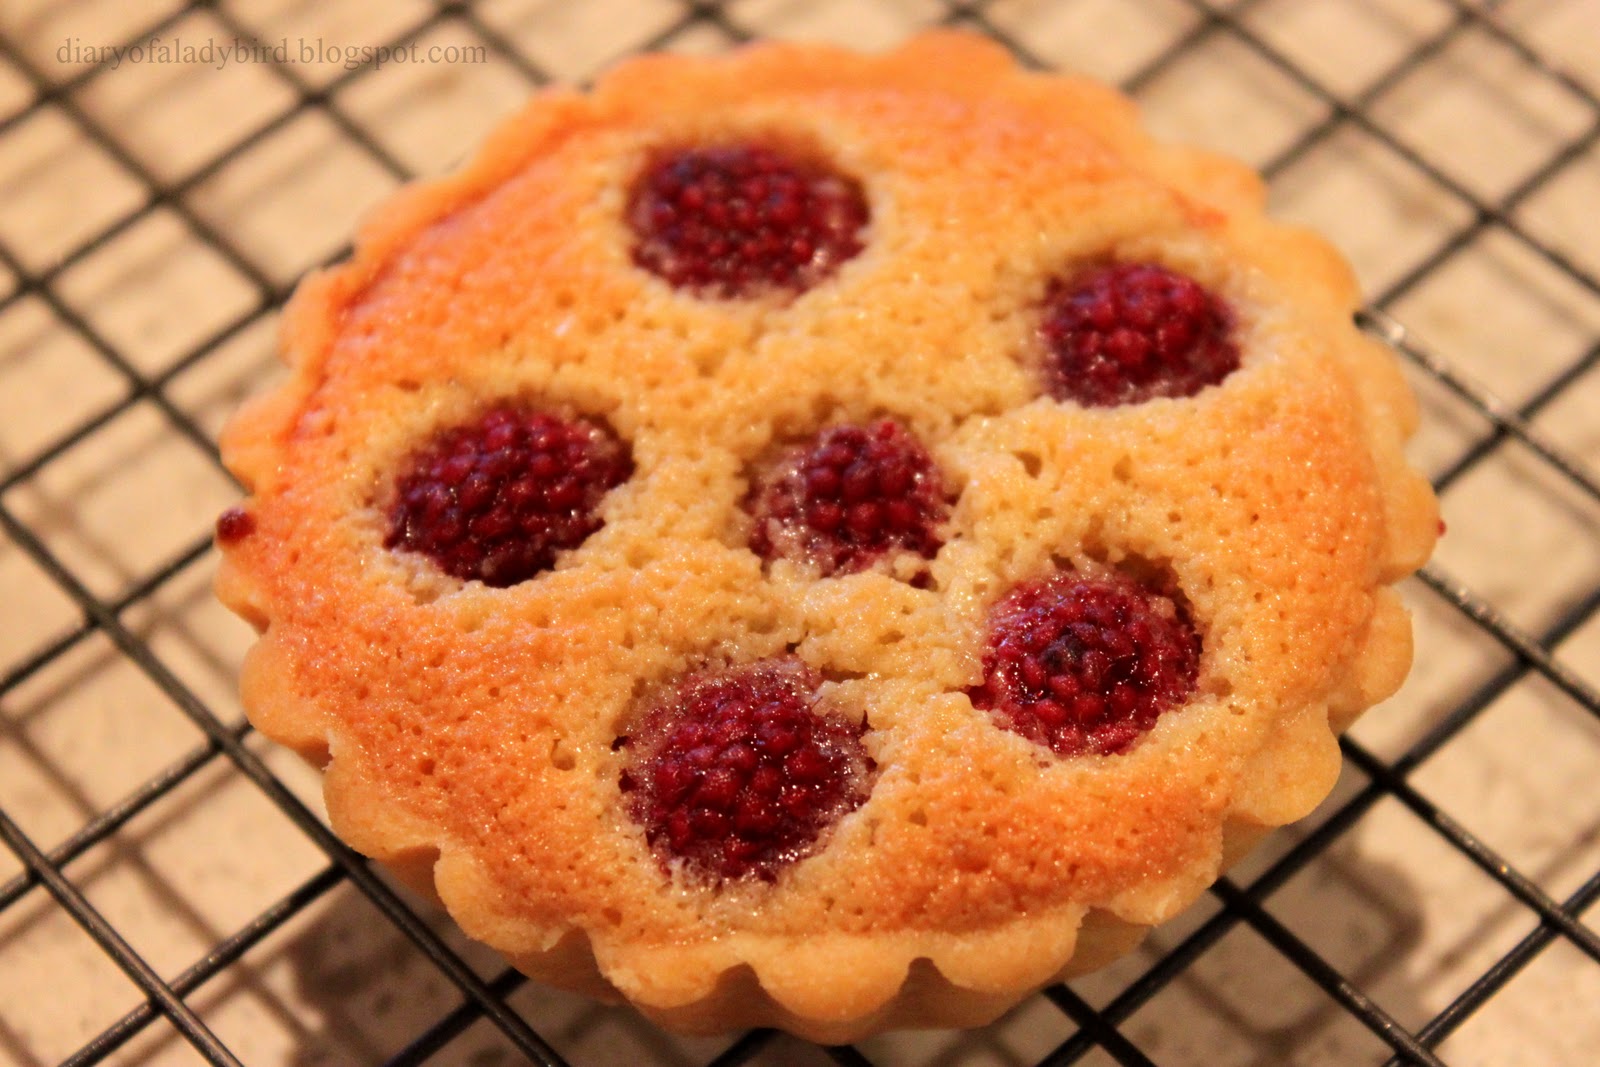
Raspberry Frangipane Tarts


Fruit is by far one of my favourite aspects of Australian Summer.. mangoes, peaches, nectarines, cherries, strawberries and... raspberries! I picked up these beauties at Maloneys Grocer on Crown Street in Surry Hills over the weekend. Beautiful Tasmanian raspberries for only $4 a punnet! These were just so good I was inspired to incorporate them into a dish where they could shine in all their jewel-like glory!


This recipe is an adaptation of the Frangipane Tart recipe showcased by Matt Moran on Masterchef Australia in 2010. A good frangipane tart is a great addition to every baker's repertoire - with its 'melt in your mouth' crumbly pastry and almond filling, it is the perfect platform for your favourite fruit(s) to make for a simple and elegant dessert. I find the following to be a good reliable recipe, particularly the lovely pâte brisée - a delicate shortcrust pastry that just breaks (brisée being the verb 'to break' in french) as you bite into it. The other great thing about this recipe is that you don't have to blindbake the tart case!

Raspberry Frangipane Tarts
makes 16 x 8cm tarts, but can easily be halved

Ingredients

375g plain flour
50g icing sugar
200g unsalted butter
1 free range/organic egg

125g unsalted butter
125g icing sugar
125g almond meal
2 free range/organic eggs
1 free range/organic egg yolk
25ml dark rum

1/4c strained, warmed raspberry jam
2 punnets fresh raspberries

Method

1. Grease and line the base of your loose bottomed tart tins and set aside.
2. To make the pastry, add the flour, icing sugar and butter to the bowl of a food processor and pulse until the mixture resembles coarse breadcrumbs. Add the egg and pulse again until the dough comes together. Wrap in cling wrap, then rest in the fridge for about 1 hour.


3. On a lightly floured surface, roll out half of the pastry until 3-4mm thick. (you can freeze remaining pastry for up to 4 weeks). Line the tart tin with pastry, then rest in the fridge for 15 minutes.

4. For the frangipane, cream the butter and sugar in an electric mixer until pale and fluffy. Be careful not to overbeat it. Add the eggs and egg yolk, one at a time until incorporated in the mixture. Fold in the almond meal and dark rum.


5. Remove the tart tins from the fridge. Brush half of the jam over the bottom of the tarts, then spread a spoonful of frangipane into each tart case. Lightly press 6 raspberries into the mixture of each tart.


6. Bake in a preheated oven at 180 degrees celcius for 30-35 until golden and cooked through. Remove from the oven and brush each tart lightly with remaining raspberry jam. Serve with whipped cream and any remaining berries.


Having made frangipane tarts at home for the first time, I can't believe how good they taste is in comparison to the dry frangipane tarts I've tried in cafes in the past. There really is no comparison - the frangipane filling is beautifully moist and the pastry crumbles as you bite into it .... Mmmm! Can't wait to try this simple recipe out with other fruits such as blueberries, strawberries, nectarines or even pairings like pear and raspberry, or peach and raspberry, for example. The options are endless!


Ladybird x

Sunday, 12 December 2010

Lime & Passionfruit Curd


If you are not already sold by the title of this post, I must preface this recipe by telling you (rather unashamedly) how absolutely gorgeous it is to eat... The lime and passionfruit make this a wonderfully fresh and flavoursome curd that's like summer on a spoon. It is very easy to make, and would make a wonderful edible gift for a loved one. Stored in a jar with an airtight lid, this curd will keep in the fridge for up to 1 month.


There are many uses for a lovely curd like this... Here are are just a few ideas to get you drooling...
  • Served with pancakes
  • Injected into vanilla cupcakes with a piping tip
  • Paired with whipped cream to sandwich a sponge cake together
  •  Drizzled over ice cream
  • Served with a citrusy cheesecake

But enough with the hyperbole, where's the recipe already?!

Lime & Passionfruit Curd
Adapted recipe from 200 Christmas Recipes by Hamlyn
(makes around 2 1/4 cups quantity)

Ingredients
250g caster sugar
zest and juice of 4 limes, kept aside in separate bowls
125 unsalted butter, cut into pieces
4 eggs, beaten and strained
3 passionfuits

Method
1. Place a heatproof bowl over a saucepan of simmering water, making sure that the bowl is not touching the water. Place the sugar and zest in the bowl and press them against the edge of the bowl with a spoon to release the oils from the zest.


2. Pour the lime juice into the bowl through a sieve and add the butter. Heat, stirring occasionally, until the butter has melted.


3. Whisk the eggs into the mixture and then switch back to the wooden spoon and stir constantly to avoid curdling. Continue stirring over low heat for approximately 20-25 minutes until the curd lightly coats the back of the wooden spoon.

4. Remove the bowl from the heat and cool slightly before stirring through the passionfruit pulp.

5. Transfer to warm, sterilised jars*. Cover each jar with a disc of waxed paper, placed waxed side down. Allow to cool, then close the jars with their lids.

* How to sterilise jars
I have often wondered what this actually entails, but as it turns out, it's relatively simple! To sterilise jars wash them either in the dishwasher or in hot soapy water. Rinse and dry them in the oven on the lowest setting for 15 minutes. Fill the jars while still warm.

Note
The curd will thicken with refrigeration, but if you wish to thin it out again for use simply warm slightly.


Till next time, dear readers!

Ladybird x

Monday, 20 September 2010

Strawberry Shortcake


With strawberries so tasty and such good value at the moment, I am always on the lookout for new ways to showcase those plump red gems. Of course, strawberries are great on their own, but they are great with other things too. They're fantastic with the ricotta hotcakes I made recently, but they are also great in a strawberry shortcake - an old fashioned, classic dessert.

I actually made this strawberry shortcake for my mum-in-law as she was visiting for Singapore. She loves trying new types of foods, but she doesn't eat eggs, so this recipe was perfect for the occasion. Delicious along with a dollop of double cream or creme fraiche as part of a special afternoon tea or dessert.


Strawberry Shortcake
Recipe adapted from AWW's Sweet Old-Fashioned Favourites

This recipe made quite a lot of mixture for the base so I had leftovers. I used my leftovers to make little shortbread biscuits and stored them in an airtight container. Just refrigerate any leftover dough for a couple of hours and then roll it out and cut into desired shapes.

Ingredients
250g unsalted butter
pinch salt
1 tsp finely grated lemon zest
1 tbsp lemon juice
1/2 c caster sugar
1/3 c rice flour
1 c self raising flour
250g punnet strawberries (washed, hulled and halved)
1/2 c strawberry jam

Method
1. Lightly grease a tart tin approximately 25cm in diameter.

2. Have butter at room temperature. Beat butter, salt, zest, juice and sugar until creamy, but not too fluffy as you would aim for if making a cake. Stir in sifted flours in 2 batches. Press ingredients together gently, knead lightly until smooth. Cover with clingfilm and refrigerate for an hour.

3. Roll out dough and lay over tin, pressing it in neatly. If the dough breaks whilew doing this, don't worry too much, just continue pressing it in until you have a thin even layer. Prick the base with a fork, cover with clingfilm and refrigerate for another hour.

4. Remove tart base from fridge and remove clingfilm. Bake in a moderate oven (180-190 degrees celsuis) about 20 minutes or until lightly browned. Cool in tin.

5. Transfer tart base onto serving plate, decorate with berries. Warm jam in a small pan (or even the microwave briefly); strain and brush evenly over the strawberries.


And to sweeten Monday just a litte bit more, I am please to announce the winner of my 1st Birthday and 100th Post Giveaway.

Congratulations to Jen of Truffled Pink!
You have won a copy of '200 Cupcakes' by Joanna Farrow :)

Thank you once again to all of you, my valued readers. I appreciate each and every one of you, and I hope you all have a fantastic week!


Ladybird x
Related Posts with Thumbnails