Showing posts with label Biscuits. Show all posts
Monday, 23 December 2013
Cranberry, White Chocolate & Macadamia Cookies
Christmas is here! My shopping is done, and so is my wrapping! Just a bit more work to do in the kitchen and I'll be all set. I am looking forward to spending some relaxing time with my family, and am especially looking forward to lots of cuddles with my little Emperor and our new family addition, Little A. The Emperor knows a bit more about Santa this year, and I can't wait to see his face as he opens his gifts on Christmas morning.
Most years I make gingerbread as it tastes great and makes a nice gift. However, as much as I love gingerbread, I don't love making it in 30-something degree heat with high humidity! The dough is difficult to work, and you have to refrigerate the dough a number of times in order to keep your cookies in shape.
These cookies are a great Christmas alternative. The fact that they are so quick an easy too is a bonus. Here is the recipe so you can leave some out for Santa before you go to bed on Christmas eve ;)
Cranberry, White Chocolate and Macadamia Cookies
an adapted recipe from 'The Sweet Life' by Kate Bracks
125g butter, at room temperature, chopped
150g caster sugar
1/2 teaspoon vanilla extract
1/2 teaspoon finely grated orange zest
1 egg
260g self-raising flour
80g white chocolate, chopped into chunks
50g macadamias, roughly chopped
50g dried cranberries (craisins)
1. Preheat the oven to 175 degrees celcius. Grease two large baking trays and line with baking paper.
2. Combine the butter, sugar, vanilla and orange zest in the bowl of an electric mixer and beat until pale. Add the egg and beat until well combined, scraping down the bowl as necessary. Sift the flour into the bowl and mix until just combined.
3. Add the chocolate, macadamias and cranberries to the mixture and mix it through.
4. Gather the dough together and roll level tablespoons of mixture into balls. Place onto the prepared trays, allowing space for spreading.
5. Bake for 12-15 minutes until golden (12 minutes will make them slightly softer, 15 minutes will give you crispier cookies). Leave on trays for 5 minutes before transferring to a wire rack to cool completely.
Note: These can be stored in an airtight container for up to 1 week. The dough (before it is cooked) can be rolled into balls and frozen for up to 3 months.
Tell me, dear readers, how are your final Christmas preparations going?
Anna x
Sunday, 3 November 2013
Nan Khatai (Indian Butter Biscuits)
Today marks a very special day in the Hindu calender, Diwali. Diwali is known as the festival of lights, and is a wonderful time of year for Hindu families. Little lamps are lit in homes to usher in good fortune and happiness in the Hindu new year. Vast amounts of sumptuous food is enjoyed as part of the celebrations, including an array of sweets!
Nan Khatai is a simple little sweet one often sees around this time of year in Indian homes. I have tasted many, and tried many recipes. However, this recipe is one I have come up with myself after a good bit of tweaking and now stick to year in and year out. I love the balance of flavours, and I love the tenderness of the crumb in these delightful (and addictive) little biscuits.
Although simple, there are a couple of things key to ensuring perfection in making nan khatai. First, only use freshly ground cardamom - pre-packaged cardamom powder doesn't even come close to the beautiful aroma of freshly ground cardamom. It is the most exquisite scent! Secondly, don't overwork the dough. Last but certainly not least, let the dough rest. Really, it is much like making pastry. If you overwork the dough and fail to let it rest, you will end up with a very tough final product.
Nan Khatai
An original Diary of a Ladybird recipe
Ingredients
90g salted butter
35g unsalted butter
100g caster sugar
1/2 teaspooon freshly ground cardamom
150g plain flour
45g white rice flour
Method
1. Using an electric mixer, cream the butters, sugar and cardamom until pale and creamy.
2. Mix in combined flour until just combined, then tip out mixture onto a clean work surface. Squeeze together and shape into a disc, wrap with plastic wrap and refrigerate for 30 minutes.
3. Remove dough from the fridge and take teaspoon amounts of the dough and roll into balls and set aside. I keep in a spare plastic container with a lid. Refrigerate for a minimum of 30 minutes.
4. Place spaced apart on a baking tray lined with baking paper. Bake in a preheated oven at 160 degrees celsius. Bake for around 15 minutes or until just lightly golden.
And so to those of you celebrating, I wish you all a very happy Diwali! I hope you enjoy this recipe :)
xx
Nan Khatai is a simple little sweet one often sees around this time of year in Indian homes. I have tasted many, and tried many recipes. However, this recipe is one I have come up with myself after a good bit of tweaking and now stick to year in and year out. I love the balance of flavours, and I love the tenderness of the crumb in these delightful (and addictive) little biscuits.
Although simple, there are a couple of things key to ensuring perfection in making nan khatai. First, only use freshly ground cardamom - pre-packaged cardamom powder doesn't even come close to the beautiful aroma of freshly ground cardamom. It is the most exquisite scent! Secondly, don't overwork the dough. Last but certainly not least, let the dough rest. Really, it is much like making pastry. If you overwork the dough and fail to let it rest, you will end up with a very tough final product.
Nan Khatai
An original Diary of a Ladybird recipe
Ingredients
90g salted butter
35g unsalted butter
100g caster sugar
1/2 teaspooon freshly ground cardamom
150g plain flour
45g white rice flour
Method
1. Using an electric mixer, cream the butters, sugar and cardamom until pale and creamy.
2. Mix in combined flour until just combined, then tip out mixture onto a clean work surface. Squeeze together and shape into a disc, wrap with plastic wrap and refrigerate for 30 minutes.
3. Remove dough from the fridge and take teaspoon amounts of the dough and roll into balls and set aside. I keep in a spare plastic container with a lid. Refrigerate for a minimum of 30 minutes.
4. Place spaced apart on a baking tray lined with baking paper. Bake in a preheated oven at 160 degrees celsius. Bake for around 15 minutes or until just lightly golden.
And so to those of you celebrating, I wish you all a very happy Diwali! I hope you enjoy this recipe :)
xx
Labels:
Biscuits,
Eggless,
Eggless baking,
Indian Cuisine
Monday, 16 April 2012
Cookies fit for a domestic god
The Roman Emperor has been a bit unsettled over the past week or so meaning that nights are somewhat restless and sleep is often hard to come by. I'm not quite sure if it's Roman teething, or simply doing his best newborn baby impression, but it's been rough. It's during tough times like these that I find myself counting my blessings as Mr L picks up the pieces as I carry on as best I can in my zombie-like state. He helps cook meals, he washes clothes, he walks and feeds the dog... he tells me my hair could do with a wash because it smells like apple puree... ;) He's an all-round domestic god!
I whipped him up a quick batch of these fabulous cookies while the emperor slept today as a little thank you for all his help recently. Mr L has a complete weakness for choc-chip cookies. He will be annoyed for me saying so, but it really is rather sweet watching a full-grown man enjoying cookies and milk in his pyjamas... hahaha.
This recipe comes from my cookbook of the month for April - The Sweet Life by 2012 MasterChef Australia winner, Kate Bracks. The more I read and cook, the more I am convinced that my cookbook collection is far closer to being complete thanks to this book.
Choc-Chunk Cookies (makes about 30)
Ingredients
125g (regular, i.e. salted) butter
110g (1/2 cup) caster sugar
110g (1/2 cup) brown sugar
1 tsp vanilla extract
1 egg
260g (1 & 3/4 cups) self-raising flour
180g dark chocolate
Method
1. Preheat the oven to 175 degrees celcius. Grease 2 large baking trays and line with baking paper.
2. Combine the butter, both sugars and the vanilla in the bowl of an electric mixer and beat until pale. Add the egg and beat until well combined, scraping down the bowl as necessary. Sift the flour into the bowl and mix until just combined.
3. Cut the chocolate into 1 cm wide lengths diagonally across the block. It will naturally shatter a little. Then cut in the same way in the opposite direction. This way you get random-sized chunks of chocolate. Tip the whole lot in and mix through.
4. Gather the dough together and roll level tablespoons of mixture into balls. Place onto the prepared trays, leaving space between them for spreading.
5. Bake for 12-15 minutes until golden (12 minutes will make them slightly softer, 15 minutes will give you crispier cookies. Leave on the trays for 5 minutes, then transfer to a wire rack to cool completely.
Without doubt, this is now my absolute go-to choc-chip (or choc-'chunk' in this case) cookie recipe... I previously posted, and raved about a Nigella Lawson recipe for perfect choc-chip cookies. They don't have a patch on these bad boys.. Sorry, Nigella, and thank you, Kate!
Til next time readers... Happy cooking, and (am hoping rather indulgently for myself), sweet dreams!
Ladybird xxx
I whipped him up a quick batch of these fabulous cookies while the emperor slept today as a little thank you for all his help recently. Mr L has a complete weakness for choc-chip cookies. He will be annoyed for me saying so, but it really is rather sweet watching a full-grown man enjoying cookies and milk in his pyjamas... hahaha.
This recipe comes from my cookbook of the month for April - The Sweet Life by 2012 MasterChef Australia winner, Kate Bracks. The more I read and cook, the more I am convinced that my cookbook collection is far closer to being complete thanks to this book.
Choc-Chunk Cookies (makes about 30)
Ingredients
125g (regular, i.e. salted) butter
110g (1/2 cup) caster sugar
110g (1/2 cup) brown sugar
1 tsp vanilla extract
1 egg
260g (1 & 3/4 cups) self-raising flour
180g dark chocolate
Method
1. Preheat the oven to 175 degrees celcius. Grease 2 large baking trays and line with baking paper.
2. Combine the butter, both sugars and the vanilla in the bowl of an electric mixer and beat until pale. Add the egg and beat until well combined, scraping down the bowl as necessary. Sift the flour into the bowl and mix until just combined.
3. Cut the chocolate into 1 cm wide lengths diagonally across the block. It will naturally shatter a little. Then cut in the same way in the opposite direction. This way you get random-sized chunks of chocolate. Tip the whole lot in and mix through.
4. Gather the dough together and roll level tablespoons of mixture into balls. Place onto the prepared trays, leaving space between them for spreading.
5. Bake for 12-15 minutes until golden (12 minutes will make them slightly softer, 15 minutes will give you crispier cookies. Leave on the trays for 5 minutes, then transfer to a wire rack to cool completely.
Without doubt, this is now my absolute go-to choc-chip (or choc-'chunk' in this case) cookie recipe... I previously posted, and raved about a Nigella Lawson recipe for perfect choc-chip cookies. They don't have a patch on these bad boys.. Sorry, Nigella, and thank you, Kate!
Til next time readers... Happy cooking, and (am hoping rather indulgently for myself), sweet dreams!
Ladybird xxx
Tuesday, 5 July 2011
Win a $50 Byron Bay Cookie Company hamper!
While in Byron Bay recently, I had the pleasure of visiting the Byron Bay Cookie Company's headquarters and retail outlet to learn more about their range of products. I also had the pleasure of sampling some of their delicious baked goods - lucky me! :)
Many of you reading this post will already know about Byron Bay Cookie Company's cookies - they are avaialble in a vast range of flavours and there are plenty of gluten-free options. They can be seen in cafes and coffee carts around Australia, as well as on airlines and in selected department stores both in Australia and the UK. Their products are now also available for purchase through http://www.cookie.com.au/ and http://www.amazon.com/.
My personal favourites are the white choc chunk & macadamia nut cookie, the brand new muesli cookie, as well as the Byron Bay Gourmet Food's wonderful (and Sydney Royal Show gold medal winning) rosemary & sea salt crispbread - great served on a cheese platter. I'm also a big fan of the Luken & May range - great for sharing at home, or a lovely gift when visiting family/friends.
To enter:
Good luck!
Ladybird x
Many of you reading this post will already know about Byron Bay Cookie Company's cookies - they are avaialble in a vast range of flavours and there are plenty of gluten-free options. They can be seen in cafes and coffee carts around Australia, as well as on airlines and in selected department stores both in Australia and the UK. Their products are now also available for purchase through http://www.cookie.com.au/ and http://www.amazon.com/.
The Byron Bay Cookie Company has been around since 1990 and is probably best known for its large, iconic cookies. Nowadays though, there are also the smaller, delicious biscuits from Luken & May, and crispbreads from Byron Bay Gourmet Foods.
My personal favourites are the white choc chunk & macadamia nut cookie, the brand new muesli cookie, as well as the Byron Bay Gourmet Food's wonderful (and Sydney Royal Show gold medal winning) rosemary & sea salt crispbread - great served on a cheese platter. I'm also a big fan of the Luken & May range - great for sharing at home, or a lovely gift when visiting family/friends.
*** GIVEAWAY ***
Thanks to the good people at the Byron Bay Cookie Company, one lucky Diary of a Ladybird reader has the chance to win this wonderful hamper of delicious Byron Bay Cookie Company products, worth $50!- Simply tell me what your favourite Byron Bay Cookie Company product is by commenting on this post.
- Then, email me a copy of your comment along with your full name and delivery address to diaryofaladybird[at]gmail[dot]com.
Good luck!
Ladybird x
*** This giveaway has now closed ***
Congratulations to Erin of Gravelly Beach in Tasmania!
Labels:
Biscuits,
Byron Bay,
Edible gifts,
Giveaway,
Gluten-free,
NSW
Monday, 20 December 2010
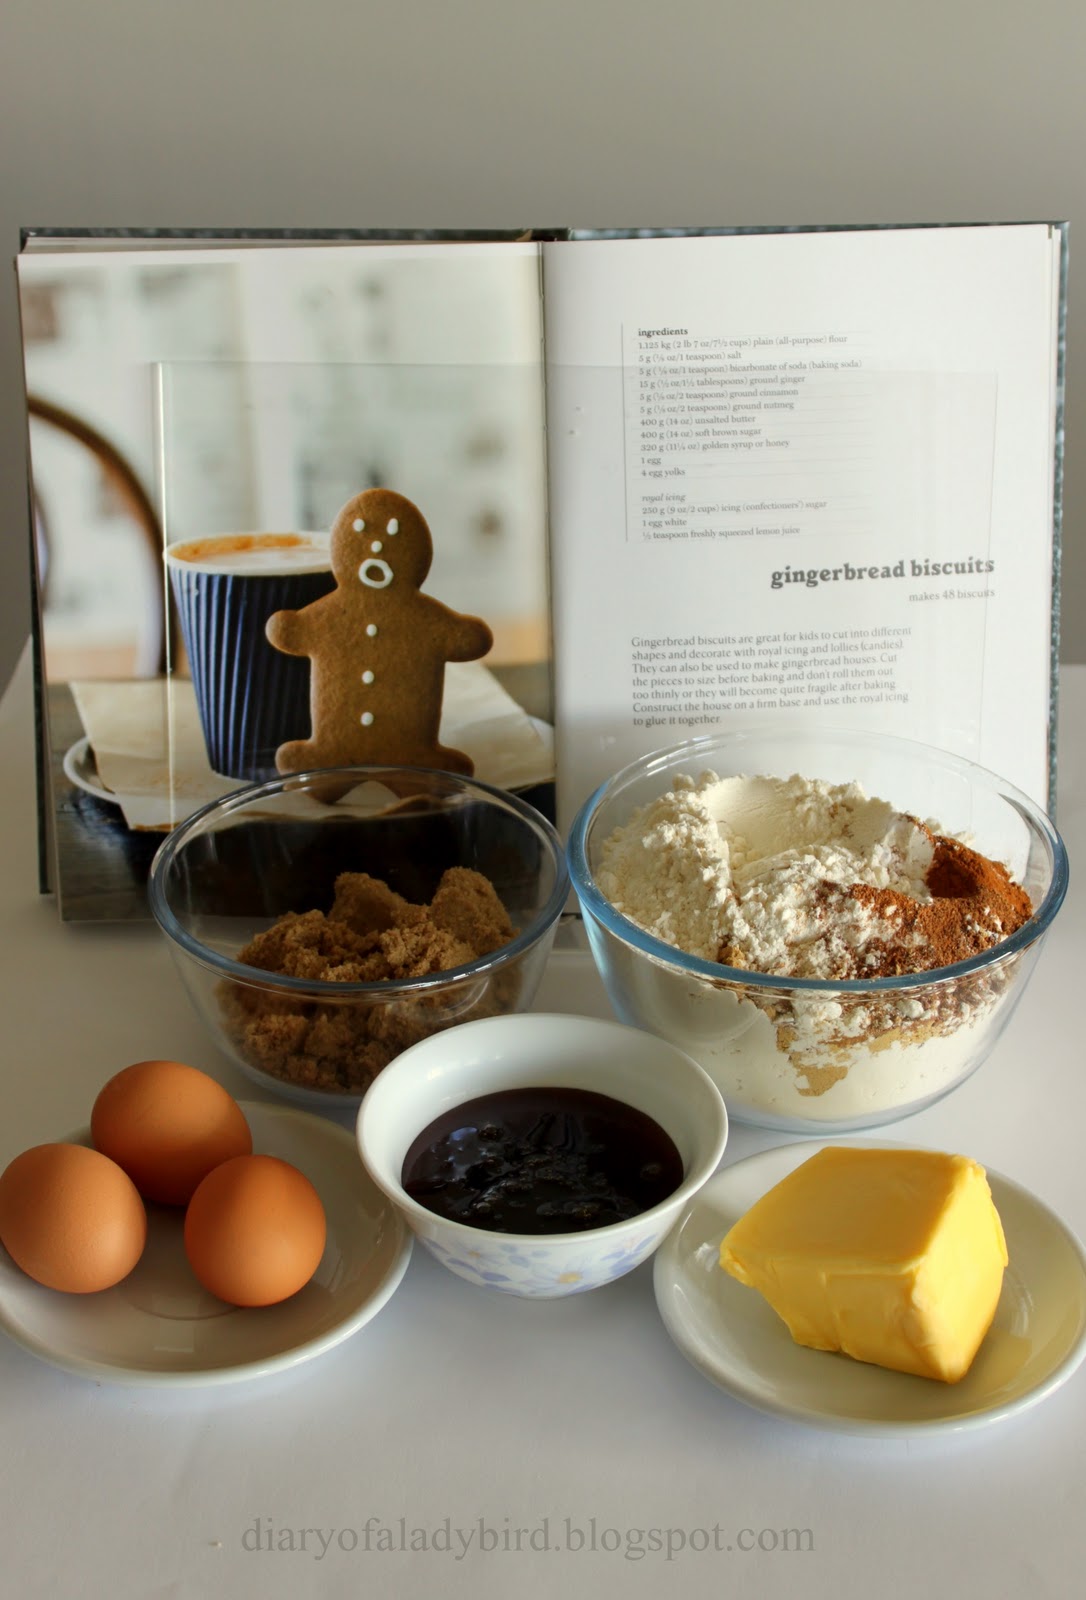
Gingerbread Biscuits & Gluehwein (Mulled Wine)
Dear Santa,
Soon you will be making your way around the world delivering thousands and thousands of gifts to all the good boys and girls of the world. I do hope you visit my home on your deliveries... I have really tried to be good this year, I really have!
I'm sure you must get awfully hungry visiting so many houses in one night! Just to let you know, I'll be leaving you out a little snack for when you stop by. I know you get a lot of milk and cookies, but I thought you could probably do with something a little stronger by the time you reach Australia.
I hope you like gingerbread and mulled wine :)
Love,
Ladybird xoxo
PS - here is my Christmas tree :)
Adapted recipe from The Cook and The Chef, ABC Television
Ingredients
1L red wine (I used a clean skin merlot)
120ml orange juice
60g raw sugar
1/2 cinnamon stick
6 cloves
1 bay leaf
peelings of half a lemon
Method
1. Bring the sugar, spices and orange juice to a boil. Then let this mixture steep for 30 minutes.
2. Finally, pour in the wine and carefully reheat to just under the boiling point.
3. Strain if desired and serve.
Bourke Street Bakery Gingerbread Biscuits
Recipe from Bourke Street Bakery: The Ultimate Baking Companion (can be halved for a smaller quantity)
Ingredients
1.125kg plain flour
1 tsp salt
1 tsp bicarbonate of soda
1 1/2 tbsp ground ginger
2 tsp ground cinnamon
2 tsp ground nutmeg
400g unsalted butter
400g soft brown sugar
320g golden syrup (or honey)
1 egg
4 egg yolks
For the royal icing
1 egg white
250g icing (confectioner's) sugar
1/2 tsp freshly squeezed lemon juice
Method
1. Put the butter, sugar and golden syrup in a large bowl and mix on medium speed until pale and creamy. Add the egg and egg yolks in a slow stream and mix until well combined. Add the dry ingredients, in three batches, until thoroughly mixed through.
2. Divide the dough into four even-sized portions and flatten each disc. Cover with plastic wrap and refrigerate for at least 20 minutes, or for up to 3 days.
3. Preheat oven to 170 degrees celcius. Remove the dough from the refrigerator and allow the dough to soften slightly. Roll out each disc between two sheets of baking paper until about 3mm thick. Cut into the desired shaped using biscuit cutters or a knife. Re-roll to make use of all the dough.
4. Place the biscuits on baking trays lined with baking paper and bake, in batches, for 15-20 minutes until slightly puffed and golden. Allow to cool on the trays. (Tip - to ensure your cookies hold their shape well while baking you can refrigerate them for 30 minutes prior to baking).
5. Meanwhile, make the royal icing. Sift the icing sugar through a fine sieve. place the egg white in a bowl and add 1 tbsp of the icing sugar. Using a wooden spoon, beat to form a smooth paste, then keep adding the sugar, 1 tbsp at a time, beating well after each addition. Stir in the lemon juice - you should be able to squeeze the mixture through a piping bag. Transfer to a piping bag and decorate the biscuits as desired. Once decorated and dry, they can be stored in an airtight container for up to 2 weeks.
I hope you are all well and truly enjoying the festive season and time with your loved ones over good food and drink!
Stay tuned for more Christmas posts!
Ladybird x
Labels:
Biscuits,
Bourke St Bakery,
Christmas,
Drinks
Thursday, 9 December 2010
Cranberry & White Chocolate Bites
Around this time last year, I made white chocolate and macadamia shortbread cookies and packaged them up and gave them away as Christmas gifts. I wanted to do something similar again this year, but this time I wanted them to taste a little more Christmasy, so the inclusion of cranberries in a cookie seemed like a good idea.
I usually follow recipes that I come across and don't spend much time developing my own recipes, but this is something I'm very keen on doing more of, especially in 2011. So, in the spirit of getting a head start of new year's resolutions, here is my recipe for these little bite size Christmas treats. Quick and easy to make, these make a great gift for friends with little notice.
The recipe makes around 60 cookies that can be kept in an airtight container for up to a week (if they last!).
White Chocolate & Cranberry Bites
An original Diary of a Ladybird recipe!
Ingredients
200g unsalted butter, softened
pinch salt
1/4 c caster sugar
1 tsp vanilla extract
1 1/2 c plain flour
2 tbsp rice flour
1/4 c dried cranberries, finely chopped
Half block (90g) white chocolate, finely chopped
1. Preheat the oven to 180 degrees celcius and line two baking trays with baking paper.
2. Cream the butter, sugar and pinch of salt. Add the plain flour and rice flour, then mix in the cranberries and white chocolate.
3. Roll small teaspoonfuls of mixture into balls and place on the baking tray, and bake for around 10 minutes or until golden.
4. Cool on the tray for 5 minutes before transferring to a wire rack to cool completely.
Labels:
Biscuits,
Chocolate,
Christmas,
Edible gifts,
Eggless
Monday, 4 October 2010
The perfect chocolate chip cookie (?)
These cookies seemed like a good place to start after I read what Nigella had to say about her pursuit of the perfect chocolate chip cookie recipe:
I've tried. I can't tell you how often I've tried. Many cookies have been baked, and many have been eaten. What do they say? Dirty work, but someone's got to do it. And the cookie recipe that follows i happy evidence that my hard work has not been for naught.
I've tried a lot of chocolate chip cookie recipes too (but probably not as many as Nigella though!) and I'll give you my review shortly, but first here is the recipe!
Chocolate chip cookies
(from Kitchen by Nigella Lawson)
(makes approx. 14)
150g soft unsalted butter
125g soft light brown sugar
100g caster sugar
2 teaspoons vanilla extract
1 egg, fridge-cold
1 egg yolk, fridge-cold
300g flour
1/2 teaspoon bicarbonate of soda
326g milk chocolate chips
Preheat the oven to 170 degrees Celsius/gas mark 3. Line a baking sheet with baking parchment.
Melt the butter and let it cool a little. Put the brown and white sugars into a bowl, pour the slightly cooled, melted butter over them and beat together.
Beat in the vanilla, the cold egg and cold egg yolk until your mixture is light and creamy.
Slowly mix in the flour and bicarb until just blended, then fold in the chocolate chips.
Scoop the cookie dough into an American quarter-cup measure or a 60ml round ice-cream scoop and drop onto the prepared baking sheet, plopping the cookies down about 8cm apart. You will need to make these in 2 batches, keeping the bowl of cookie dough in the fridge between batches.
Bake for 15-17 minutes in the preheated oven, or until the edges are lightly toasted. Cool on the baking sheet for 5 minutes before transferring to wire racks.
Make ahead note
The cookies can be made up to 3 days ahead and stored in an airtight container. Will keep for a total of 5 days.
Freeze Note
Unbaked cookie dough can be scooped onto parchment paper lined baking sheets and frozen until solid. Transfer frozen dough to resealable bags and freeze for up to 3 months. Bake direct from frozen, as directed in recipe but adding extra 2-3 minutes to baking time.
The Verdict
These cookies were tasty and I really enjoyed the texture - crisp on the edges with a slightly squidgy interior. Flavour wise they were good, a choc-chip cookie that I imagine children would devour. But for me I prefer a more grown-up chocolate taste, so I think I'd replace the milk chocolate chips with either semi-sweet or dark chocolate chips next time. Everyone's palate is different though, so you'll have to give these a go yourself!
Also, a note on the size of these cookies... If you follow Nigella's ice cream scoop tip (which is undoubtedly handy and quick, I cannot deny that), you will end up with HUGE cookies (pictured above). Some love the sort of cookies that are as big as your palm, but I myself am not a huge fan of this. I find them too much to eat, so I made some big ones, as well some smaller ones with my tablespoon scoop. Smaller ones (pictured below) of course cook quicker, and they fit a lot easier in my cookie jar :)
Stay tuned for the next instalment of Nigella's latest work!
Ladybird x
Monday, 27 September 2010
Daring Bakers' Challenge - September 2010
So last month I had hoped to participate in my first Daring Bakers' Challenge. Alas, life got in the way and I didn't manage to complete the challenge. This time around, I was far more organised, and I completed the challenge!
Am I happy I did it? Yes, but my oh my.. I was in a world of pain with this challenge! Having never piped royal icing before it was rather tricky, made all the more so difficult by the fact I lost the piping attachment I needed. Without it, I decided to soldier on with a sandwich bag snipped in the corner. Not such a good idea, as it turns out, but oh well :)
September 2010's challenge was hosted by Mandy from What the Fruitcake?! Mandy challenged everyone to bake and decorate basic sugar cookies using recipes from Peggy Porschen and The Joy of Baking. We had to give our cookies/biscuits a theme of significance to us in the month of September.
For me (and fellow antipodeans) September marks the beginning of Spring! Spring themed cookies seemed like a good idea, and I decided to take it one step further and create a spring themed cookie bouquet.
Basic Sugar Cookies
Makes Approximately 36x 10cm / 4" Cookies
Ingredients
200g / 7oz / ½ cup + 6 Tbsp Unsalted Butter, at room temperature
400g / 14oz / 3 cups + 3 Tbsp All Purpose / Plain Flour
200g / 7oz / 1 cup Caster Sugar / Superfine Sugar
1 Large Egg, lightly beaten
5ml / 1 tsp Vanilla Extract / Or seeds from 1 vanilla bean
a pinch of salt
Directions
Cream together the butter, sugar, salt and any flavourings you’re using. Beat until just becoming creamy in texture. Tip: Don’t over mix otherwise you’ll incorporate too much air and the cookies will spread during baking, losing their shape.
Beat in the egg until well combined, make sure to scrape down the sides of the bowl. Add the sifted flour and mix on low until a non sticky dough forms.
Knead into a ball and divide into 2 or 3 pieces. Roll out each portion between parchment paper to a thickness of about 5mm/1/5 inch (0.2 inch)
Refrigerate for a minimum of 30mins. Tip: Recipes commonly just wrap the whole ball of dough in clingwrap and then refrigerate it for an hour or overnight, but by rolling the dough between parchment, this shortens the chilling time and then it’s also been rolled out while still soft making it easier and quicker.
Once chilled, peel off parchment and place dough on a lightly floured surface. Cut out shapes with cookie cutters or a sharp knife. Arrange shapes on parchment lined baking sheets and refrigerate for another 30mins to an hour. Tip: It’s very important you chill them again otherwise they’ll spread while baking.
Re-roll scraps and follow the above process until all scraps are used up.
Preheat oven to 180°C (160°C Fan Assisted) / 350°F / Gas Mark 4. Bake until golden around the edges, about 8-15mins depending on the size of the cookies. Tip: Bake same sized cookies together otherwise mixing smaller with larger cookies could result in some cookies being baked before others are done.
Tip: Rotate baking sheets half way through baking if your oven bakes unevenly.
Leave to cool on cooling racks. Once completely cooled, decorate as desired.
Royal Icing
315g – 375g / 11oz – 13oz / 2½ – 3 cups Icing / Confectioner’s / Powdered Sugar, unsifted
2 Large Egg Whites
10ml / 2 tsp Lemon Juice
5ml / 1 tsp Almond Extract, optional
Directions
Beat egg whites with lemon juice until combined. Tip: It’s important that the bowls/spoons/spatulas and beaters you use are thoroughly cleaned and grease free.
Sift the icing sugar to remove lumps and add it to the egg whites. Tip: I’ve listed 2 amounts of icing sugar, the lesser amount is good for a flooding consistency, and the larger amount is for outlining, but you can add even more for a much thicker consistency good for writing. If you add too much icing sugar or would like to make a thinner consistency, add very small amounts of water, a few drops at a time, until you reach the consistency you need.
Beat on low until combined and smooth. Use immediately or keep in an airtight container. Tip: Royal Icing starts to harden as soon as it’s in contact with air so make sure to cover containers with plastic wrap while not in use.
I'm looking forward to reading all my fellow Daring Bakers' Challenge posts for this month! I'm sure there are some fantastic cookies out there :)
Ladybird x
Labels:
Biscuits,
Daring Bakers' Challenges
Thursday, 15 July 2010
Bastille Day Cookies
Alas this post is a day late (sigh)... I seem a bit out of sorts with my food blogging at the moment.. Leaving my camera at home when I go out, laptop out of action, kitchen disasters... mon dieu! It's been a funny week, but at last I bring you my Bastille Day cookies!
Cookies for such an important day in the French calendar would not be suitable unless they themselves were a little French. I had been hanging onto a french butter biscuit recipe for months, scribbled down on a post-it note floating around my handbag.. crying out for some love and attention! Regrettably, I do not have the source for this recipe, so do forgive me. Oh, and a brief disclaimer.. if you are the French baking police I do not purport to be an expert on anything French, let alone French baking :)
These butter cookies are known as Sables. 'Sables' is French for 'sand' and refers to the sandy texture of this delicate, shortbread like cookie. Sables are said to originate from Normandy, France.
Like many sweet French recipes, the quality of your final result depends on the quality of your ingredients. So it seemed only appropriate to use two of my absolute favourite ingredients for baking... Lurpak unsalted butter and vanilla bean paste.
Here is the recipe to this simple (but a bit 'ooh la la') cookie recipe.
Sables
140g unsalted butter, at room temperature
100g caster sugar
1 large egg
1 tsp vanilla bean paste
260g plain flour
1/2 tsp baking powder
scant 1/4 tsp salt
1. With an electric mixer, cream the butter, sugar and vanilla until light and fluffy. Add egg and combine well.
2. In a separate bowl combined the dry ingredients and whisk together briefly to remove lumps.
3. Add the flour mixture to the butter mixture and beat until just incorporated. Take care not to overbeat.
4. Divide the dough in half and wrap in cling film and refrigerate until firm. A couple of hours is best.
5. On a lightly floured surface, bring the dough together and roll out to around a half centimetre thickness.
6. Cut out desired shapes and transfer onto baking trays lined with baking paper.
7. Place the baking tray in the fridge for about 20 minutes to chill and firm up the dough and preheat the oven to 175 degrees celsius (350 degrees F).
8. Bake for about 12 minutes or until golden at the edges. Cool briefly on trays before transferring to a wire rack to cool completely.
Once cool I rolled out thin strips of blue, white and red fondant. To stick the fondant to the cookies, I dabbed a tiny amount of water here and there on the reverse side of the fondant. And voila - miniature, edible French flags!
Viva la France!
Ladybird x
Labels:
Biscuits,
French Cuisine
Saturday, 26 June 2010
Little Macs (Cheeseburger Macarons)
My pursuit and growing obsession over macarons continues, and this was my third attempt to try and perfect this little french sweet. Upon the advice of my fellow blogger and friend from My Button Cake, I tried the Gourmet Traveller macaron recipe. Seeing as though there are so many macaron recipes, tips and tricks out there, I felt it would be wise to take advice from Amber as she is such a deft hand at macarons.
However, I didn't want to make plain macarons.. I wanted to do something a bit more creative. Watching Masterchef contestants try and recreate Heston Bluemnthal's amazing dishes, I was inspired to create something sweet that looked like a savoury item. I thought a fast food item would be fun to do, so here is a sweet (and very small) take on the Big Mac.
Introducing The Little Mac... (as in 'macaron'!)
To start making these little macs I made the macarons. I coloured the batter with a little bown and yellow food colour to achieve the bun tone, and then I topped some of them with a sprinkle of sesame seeds before baking. I was reasonably happy with the macarons after baking .. The feet were not quite as high as they could be, so I may have overmixed a little. However, the shell was nice and delicate, and the inside was lovely and squidgy :) Voila - a toasted sesame seed bun!
Burger filling
The patties were made by cutting out circles from readymade chocolate biscuits. For the lettuce and cheese slices, I coloured white fondant with green and yellow food colouring and rolled it out thinly. For the cheese I cut out a neat square, and for the lettuce I cut up a rough circle and frilled the edges roughly with my fingertips for a realistic effect.
The secret sauce
Well, it's not secret anymore ;) I used a white chocolate ganache made by using 1/4 cup pure cream and 150g white chocolate combined in a bowl over a pot of simmering water.
To put the Little Mac together I layered the lettuce, cheese, patty and macaroon shells with a little ganache in between.
These macarons were so much fun to make, and I must say, the likeness to the real thing is humorous :D And if you're more of a cheeseburger than a Big Mac fan.. you could skip the extra layer :)
Have a great weekend, readers!
Ladybird x
Friday, 18 June 2010
Lemon Liqueur Macarons
These are the second batch of macarons I've made, and (it must be said) a vast improvement on my first attempt, but still a long way off from being right. Learning how to make macarons is a frustrating process! In my paranoia about overmixing the batter, I ended up undermixing and so the batter was quite lumpy and difficult to pipe. Edible and tasty, but not very aesthetically appealing... But also one step further towards a perfect macaron :)
As a result of my mistakes in the first batch, I learnt a lot about how to make macarons and now a bit more confident in setting about making these little french delicacies again in future. I have also learnt a lot from reading online. The wealth of knowledge and experience available via the Internet never ceases to amaze me - it's incredible!
I love anything lemony, so I enjoyed these little lemon liqueur macarons. I made mine a little too fat, but made smaller this recipe makes 16 complete macarons.
From The Australian Women's Weekly: Macaroons & Biscuits.
Ingredients
3 eggwhites
1/4 c (55g) caster sugar
yellow food colouring
1 1/4 c (200g) icing sugar
1c (120g) ground almonds
2 tsp finely grated lemon ring
1 tbsp icing sugar, extra
1/4 c pouring cream
150g white chocolate, chopped coarsely
4 tsp limoncello liqueur
Method
Macarons
1. Grease oven trays and line with baking paper.
2. Combine the ground almonds and icing sugar and sieve twice. Set aside.
3. Beat eggwhites slowly and then gradually increase speed until soft peaks form. Add caster sugar a spoonful at a time and a few drops of the food colouring, beat until the sugar dissolves. Fold in sifted icing sugar, ground almonds and rind in two batches.
4. Spoon mixture into piping bag fitted with 2cm plain tube. Pipe 4 cm rounds about 2 cm apart onto trays. Tap trays on bench so macarons spread slightly. Dust macaroons with extra sifted icing sugar. Stand 30 minutes.
5. Meanwhile, preheat oven to 150 degrees Celsius.
6. Bake macarons about 20 minutes until crisp, but not coloured. Cool on trays.
Ganache
1. Bring cream to the boil in a small saucepan, remove from heat, add chocolate, stir until smooth. Stir in liqueur, stand at room temperature until spreadable.
2. Sandwich macarons with filing.
Tips
- Age the eggwhites overnight. I let mine sit out of the fridge in a small container (winter here at the moment, so no problem).
- Beating the eggwhites slowly and then increasing the speed strengthens the eggwhites.
- Don't be afraid of being too rough with the batter. It is important to fold the mixture, but it is more important to achieve a nice smooth batter. When recipes say "it should flow like magma" (which, I feel, is an obscure and frustrating comparison!), they mean it should ooze in slow motion when you tip the bowl to the side.
- To remove any piping peaks (or 'nipples' as I have heard them referred to as in my reading!), dip a finger in water and gently pat the top of the macaron. I forgot to do this step, so otherwise I think the tops would have been smooth.
- Sandwich macarons just before serving to avoid sogginess.
Until next time readers :) Happy baking
Ladybird x
Labels:
Biscuits,
French Cuisine,
Lemon,
Macarons
Subscribe to:
Posts (Atom)