Showing posts with label Christmas. Show all posts

Tuesday, 24 December 2013

Panettone French Toast with Cherry Compote and Brandied Mascarpone


One last post before I sign off for Christmas and New Year!

This is my own recipe for very festive and very decadent french toast. To me, this is Christmas on a plate because it combines so many of the ingredients and flavours associated with this time of year. Italian Christmas bread, cherries, cinnamon, orange, brandy... all my favourite Christmas flavours! It is rich, but if you can't have this at this time of year, when can you have it?! This recipe works a treat with stale panettone, so if you find yourself with panettone leftovers after Christmas, you'll know just how to transform them into something really special :)

For this dish, I believe the key is to getting the compote right. The compote needs acidity to cut through the sweetness of the other components, so make sure you taste it. How much sugar you need will depend on how sweet/tart the cherries are so taste as you go, and add sugar as required.

Panettone French Toast with Cherry Compote and Brandied Mascarpone
an original Diary of a Ladybird recipe
(serves 2)

Ingredients
4 pieces Panettone (I cut a 1.5cm round of my panettone by cutting it horizontally then cut into 4)
1/4 cup milk
1/4 cup cream
2 eggs
1/8 teaspoon ground cinnamon
1/2 teaspoon vanilla extract

1.5 cups pitted cherries
caster sugar, to taste (see method)
lemon juice

125g mascarpone
1 tablespoon icing sugar, plus extra to serve
1/2 teaspoon finely grated orange zest
2 teaspoons brandy
maple syrup (optional)

Method
1. In a wide shallow dish, whisk together the milk, cream, eggs, cinnamon and vanilla extract. Add the panettone to the mixture and let sit for about 10 minutes to absorb the liquid. Turn once midway. Meanwhile, make the compote and mascarpone.

8 pieces pictured as recipe doubled in this instance
2. In a small saucepan over low heat, combine the cherries with 1 tablespoon water, a squeeze of lemon juice and a teaspoon of caster sugar, adding more if desired. Simmer covered and stir occasionally for about 10 minutes.
3. Combine the mascarpone, zest, icing sugar and brandy in a small bowl and set aside.
4. Heat a large fry pan over medium heat with a little olive oil and a nob of butter. Take the panettone pieces from the dish removing any excess liquid, then cook in the pan on both sides, cooking until golden.
5. To serve, place 2 pieces of panettone on each plate, topped with the cherry compote and a dollop of mascarpone, followed by a dusting of icing sugar and maple syrup if desired.


Buon appetito and merry Christmas! See you in 2014! :)

Anna xx

Monday, 23 December 2013

Cranberry, White Chocolate & Macadamia Cookies


Christmas is here! My shopping is done, and so is my wrapping! Just a bit more work to do in the kitchen and I'll be all set. I am looking forward to spending some relaxing time with my family, and am especially looking forward to lots of cuddles with my little Emperor and our new family addition, Little A. The Emperor knows a bit more about Santa this year, and I can't wait to see his face as he opens his gifts on Christmas morning.

Most years I make gingerbread as it tastes great and makes a nice gift. However, as much as I love gingerbread, I don't love making it in 30-something degree heat with high humidity! The dough is difficult to work, and you have to refrigerate the dough a number of times in order to keep your cookies in shape.

These cookies are a great Christmas alternative. The fact that they are so quick an easy too is a bonus. Here is the recipe so you can leave some out for Santa before you go to bed on Christmas eve ;)

Cranberry, White Chocolate and Macadamia Cookies
an adapted recipe from 'The Sweet Life' by Kate Bracks

125g butter, at room temperature, chopped
150g caster sugar
1/2 teaspoon vanilla extract
1/2 teaspoon finely grated orange zest
1 egg
260g self-raising flour
80g white chocolate, chopped into chunks
50g macadamias, roughly chopped
50g dried cranberries (craisins)

1. Preheat the oven to 175 degrees celcius. Grease two large baking trays and line with baking paper.
2. Combine the butter, sugar, vanilla and orange zest in the bowl of an electric mixer and beat until pale. Add the egg and beat until well combined, scraping down the bowl as necessary. Sift the flour into the bowl and mix until just combined.
3. Add the chocolate, macadamias and cranberries to the mixture and mix it through.
4. Gather the dough together and roll level tablespoons of mixture into balls. Place onto the prepared trays, allowing space for spreading.
5. Bake for 12-15 minutes until golden (12 minutes will make them slightly softer, 15 minutes will give you crispier cookies). Leave on trays for 5 minutes before transferring to a wire rack to cool completely.

Note: These can be stored in an airtight container for up to 1 week. The dough (before it is cooked) can be rolled into balls and frozen for up to 3 months.

Tell me, dear readers, how are your final Christmas preparations going?

Anna x

Friday, 24 December 2010

Christmas Morning Crown


I love Christmas morning... I remember the excitement of Christmas mornings as a child, when you would wake up with a jolt and run to the tree ready to tear open your gifts. As an adult I still wake looking forward to the day, but make more of a sleepy, leary-eyed stumble into the living room to join family in opening gifts. The opening of gifts is pretty efficient in my family.. I know that in other families it is all very civilised and you have to wait until after breakfast... but not in mine! It can be a bit choatic, but I love it all the same :)

Christmas day breakfast is usually a pretty relaxed affair for us, and my Mum spoils the boys with a big fry up breakfast while I usually stick with my staple muesli/cereal so as not to fill up to much for the ensuing feast later in the day.

I think this recipe is also a good idea for Christmas morning as it can be prepared in advance and then baked on Christmas day. It not only looks great on a plate, but it's very easy to serve - simply pull apart! This adapted Christmas recipe comes courtesy of none other than the December/January issue of Delicious magazine - my Cookbook of the Month for December.


Christmas Morning Crown
makes 9 scrolls

1 1/2 c (225g) strong (bread flour)
7g sachet dried instant yeast
125g unsalted butter, chopped (plus extra to grease)
1/2c 9125 ml) warm milk
1 egg, beaten
50g brown sugar
2 tbsp chopped hazelnuts
1 tsp mixed spice
1/3 c (55g) chopped mixed peel
1/3 c (55g) sultanas
1/4c (50g) glace cherries, chopped
1/2 c icing sugar, sifted
lemon juice

1. Grease a large baking tray and dust with flour. I used a heavy pizza tray, but any large baking tray will do.

2. Sift flour into a large bowl, add yeast and 1/2 tsp salt. Rub in 40g of the butter to form coarse breadcrumbs. Form a well in the centre and mix in the milk and egg to form a dough. Place in a greased bowl, cover with a tea towel and leave for 1 hour in a warm place until doubled in size.


3. Meanwhile, beat remaining butter and sugar with a wooden spoon until combined. Add nuts, spice, peel, sultanas and cherries and stir to combine.

4. Punch down dough to expel air, knead briefly then roll out on a floured surface to form a 30cm x 23 cm rectangle. Spread the fruit mixture over the dough with a spatula, leaving a 2cm border along the sides. Roll up along the long side to form a log, then cut into 9 equal size pieces.


5. Place slices, cut side up, on the floured tray so it forms a circle with the slices just touching. Cover with a clean tea towel and leave to rise in a warm place for 1 hour or until slightly risen. (Once risen, you can cover the crown and chill overnight, then bring back to room temperature before baking).


6. Preheat oven to 180 degrees celcius and bake the crown for 20 minutes or until golden. Meanwhile, mix the icing sugar with enough lemon juice to form an icing thin enough for drizzling, then drizzle over the slightly cooled crown. Serve warm or at room temperature.


Tell me, dear readers, what's your Christmas morning tradition? Do you have breakfast before or after opening up your presents?


Ladybird x

Tuesday, 21 December 2010

Mushroom & Pumpkin Wellington


When I picked up the December/January issue of Delicious magazine, I admit I was instantly drawn to the pages of incredible sweet creations offered by the publication. What I didn't expect, however, was a section dedicated to vegetarian Christmas dishes. Could it really be?! I was excited to say the least... it really isn't that often that vegetarian dishes get much of a look-in at this time of year, so a special feature by Jamie Oliver was a special surprise :)

No tofurkey here (yes - tofu if the shape of a turkey.. something I've never been able to get my head around...), but rather an interesting take on a classic - the Beef Wellington.When I turned to Jamie's Mushroom & Pumpkin Wellington I knew it would be a contender for a place at the Christmas table on the 25th, so I did a trial run today for dinner. There is quite a lot of work in this dish, but like a lot of Christmas dishes, the preparation is almost therapeutic and the result is rewarding. This beef-free wellington is packed with Christmassy flavours.. I especially love the sage and chestnuts in this dish, really delicious along with the flaky pastry.


Mushroom & Pumpkin Wellington
Adapted Jamie Oliver recipe from Delicious magazine (December 2010/January 2011 issue)

Ingredients

1 small butternut pumpkin (halved lengthways, seeds scooped out, peeled and cut into thick wedges)
olive oil
1 small dired chilli, crumbled
1/2 tsp ground cinnamon
1 tbsp coriander seeds
1 rosemary sprig, leaves chopped
2 red onions, sliced
75g chestnuts, roughly chopped
small bunch sage leaves (around 8-10 leaves picked)
2 slices sourdough bread
3 garlic cloves
1 lemon
50g unsalted butter
250g swiss brown mushrooms, thinly sliced
large bunch English spinach, trimmed
1/3 c pine nuts
2 tbsp sultanas
4 squares ready-made puff pastry
1 egg, beaten with a splash of milk

Method

1. Preheat the oven to 200 degrees celcius. Toss the pumpkin wedges into a large baking pan with a splash of oil, the chilli and cinnamon - rub the pumpkin well to coat. Bash coriander seeds along with a little coarse salt in a pestle and mortar until fine, then add the rosemary and bash again for a minute or two until aromatic. Scatter this evenly over the pumpkin then cover with foil and bake for 45 minutes, or until soft. Cool, then tear into bite size chunks.


2. Meanwhile, place a pan on medium heat and add a splash of oil and cook the onion. Season well and  cook gently for 4 minutes, stirring occasionally until softened and lightly browned. Add the chestnuts and sage to the pan for the last few minutes of cooking.

3. While that's happening, toast the sourdough and rub with the cut sides of one of the garlic cloves. Tear the toast into small chunks, and once the onion is done, add the toast to the pan and mix everything together. Switch the heat off and season a little more and add the lemon zest. Set mixture aside.

4. Melt butter in a clean pan over medium heat and add the mushrooms and one clove of garlic, thinly sliced. Cook the mushrooms to 4-6 minutes until soft and quite dry. Squeeze in a little lemon juice, season well with salt and pepper, then tip into a food processor and blitz until smooth. Set puree aside.

5. Bring a large pan of salted water to boil and blanch the spinach briefly (around 30 seconds). Drain in a colander and press lightly to get rid of excess fluid, then place to one side.

6. Place a small dry pan over medium heat and toast the pine nuts for 1 minute until light brown. Tip onto a plate. Thinly slice remaining garlic clove. Return the pan to the heat and add a splash of oil, then the garlic and fry for 1-2 minutes before adding the pine nuts, sultanas and spinach. Fry everything together until warmed through and smelling delicious. Season well and turn off the heat.

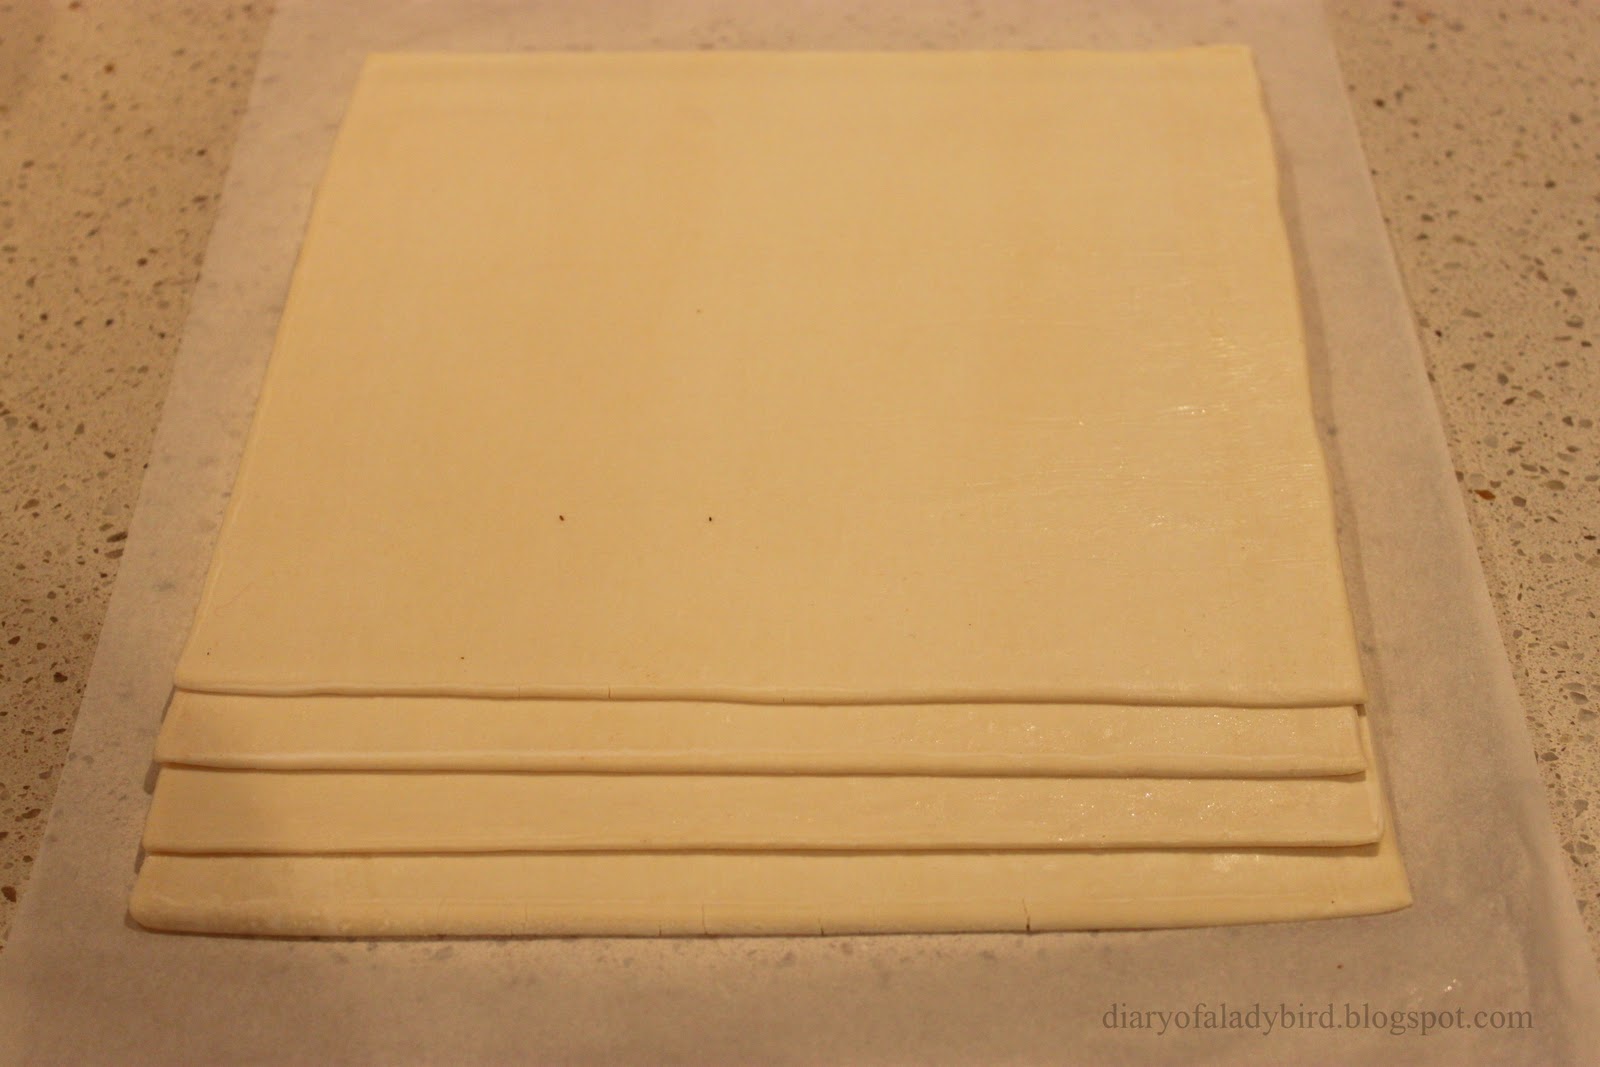
7. Once almost fully defrosted. lay the squares of pastry on top of each other, leaving a 1 cm overlap between each. Roll out between baking paper to an even 2mm thickness, and the approximate dimensions of an A3 piece of paper. Spread the mushroom mixture all over, leaving a 1cm gap on the edges of all 4 sides of the pastry (I forgot to do this, but it's fairly important once you're sealing up the wellington).


8. In a large bowl, combined the pumpkin, onions and spinach mixtures.


Spoon in a thick line down the middle of the pastry. Hold one side of the paper and lift it with the pastry, towards the centre of the wellington so it starts to cover the filling.


Peel the paper back, leaving the pastry in place. Brush some eggwash along the centre edge and pull the other side of pastry over it so that it overlaps, containing the filling in a log shape. Brush the ends with eggwash and fold in the pastry to seal it. Carefully roll onto a lined baking tray, with the sealed side down. Brush all over with egg wash and score lightly in a criss-cross fashion.


9. Bake for 45 minutes at 200 degrees Celcius, until puffed and golden. Slice thickly to serve.


So, the verdict on Jamie Olier's vegetarian wellington recipe? It's tasty, it's certainly Christmassy, and it looks great... It is a time consuming dish to make, but something like this wellington would be ideal at Christmas in a cold climate because it is so warming and comforting. I don't think this is quite the 'it' dish I was after for the Christmas menu, but good thing the Delicious magazine has plenty more recipes for me to try... If only I had more time to sample them all!

So, to all the vegetarians/vegans out there, what's your ideal savoury Christmas dish?


Ladybird x

Monday, 20 December 2010

Gingerbread Biscuits & Gluehwein (Mulled Wine)


Dear Santa,

Soon you will be making your way around the world delivering thousands and thousands of gifts to all the good boys and girls of the world. I do hope you visit my home on your deliveries... I have really tried to be good this year, I really have!

I'm sure you must get awfully hungry visiting so many houses in one night! Just to let you know, I'll be leaving you out a little snack for when you stop by. I know you get a lot of milk and cookies, but I thought you could probably do with something a little stronger by the time you reach Australia.

I hope you like gingerbread and mulled wine :)


Love,

Ladybird xoxo

PS - here is my Christmas tree :)


Gluehwein (Mulled Wine)
Adapted recipe from The Cook and The Chef, ABC Television

Ingredients
1L red wine (I used a clean skin merlot)
120ml orange juice
60g raw sugar
1/2 cinnamon stick
6 cloves
1 bay leaf
peelings of half a lemon

Method
1. Bring the sugar, spices and orange juice to a boil. Then let this mixture steep for 30 minutes.
2. Finally, pour in the wine and carefully reheat to just under the boiling point.
3. Strain if desired and serve.


Bourke Street Bakery Gingerbread Biscuits
Recipe from Bourke Street Bakery: The Ultimate Baking Companion (can be halved for a smaller quantity)

Ingredients
1.125kg plain flour
1 tsp salt
1 tsp bicarbonate of soda
1 1/2 tbsp ground ginger
2 tsp ground cinnamon
2 tsp ground nutmeg
400g unsalted butter
400g soft brown sugar
320g golden syrup (or honey)
1 egg
4 egg yolks

For the royal icing
1 egg white
250g icing (confectioner's) sugar
1/2 tsp freshly squeezed lemon juice

Method

1. Put the butter, sugar and golden syrup in a large bowl and mix on medium speed until pale and creamy. Add the egg and egg yolks in a slow stream and mix until well combined. Add the dry ingredients, in three batches, until thoroughly mixed through.


2. Divide the dough into four even-sized portions and flatten each disc. Cover with plastic wrap and refrigerate for at least 20 minutes, or for up to 3 days.


3. Preheat oven to 170 degrees celcius. Remove the dough from the refrigerator and allow the dough to soften slightly. Roll out each disc between two sheets of baking paper until about 3mm thick. Cut into the desired shaped using biscuit cutters or a knife. Re-roll to make use of all the dough.

4. Place the biscuits on baking trays lined with baking paper and bake, in batches, for 15-20 minutes until slightly puffed and golden. Allow to cool on the trays. (Tip - to ensure your cookies hold their shape well while baking you can refrigerate them for 30 minutes prior to baking).


5. Meanwhile, make the royal icing. Sift the icing sugar through a fine sieve. place the egg white in a bowl and add 1 tbsp of the icing sugar. Using a wooden spoon, beat to form a smooth paste, then keep adding the sugar, 1 tbsp at a time, beating well after each addition. Stir in the lemon juice - you should be able to squeeze the mixture through a piping bag. Transfer to a piping bag and decorate the biscuits as desired. Once decorated and dry, they can be stored in an airtight container for up to 2 weeks.


I hope you are all well and truly enjoying the festive season and time with your loved ones over good food and drink!


Stay tuned for more Christmas posts!

Ladybird x

Wednesday, 15 December 2010

Festive Portugese Tarts


I have wanted to make Portugese tarts for a very long time, ever since a friend introduced me to them.. so when I came across this recipe in the latest issue of Delicious, I knew it what simply meant to be! They are a good way of using fruit mince in a bit of a different way to fruit mince pies, and they're really easy to make. So what are you waiting for?!


Festive Portugese Tarts (makes 12)
Adapted recipe from Delicious magazine, Dec 2010/Jan 2011 issue

2 frozen puff pastry sheets, thawed
3 egg yolks
1/3 c (75g) caster sugar
2 tbsp cornflour
1c (250ml) milk
200ml thickened cream
2 tsp vanilla extract / vanilla bean paste
1/2 c (130g) fruit mince
1/4 c (20g) flaked almonds
icing sugar, to dust

1. Preheat the oven to 200 degrees celcius and grease a 12 hole muffin pan.

2. Half each puff pastry sheet, then place one half on top of the other to form 2 stacks in total. Roll up each pastry stack tightly to form a lo. Cut each pastry log into six even slices.


3. One at a time, place the pastry slices cut-side up, between 2 sheets of baking paper and, using a rolling pin, roll into 10cm rounds (this will give you extra flaky pastry). Use the rounds to line the muffin pan, then chill while you make the filling.


4. Gently whisk the yolks, caster sugar, flour and milk together in a small saucepan. Cook over low heat, whisking constantly for 5-6 minutes until thick. Remove the custard from the heat and stir in the thickened cream and vanilla extract. Transfer the custard to a bowl, then closely cover the surface with plastic wrap to prevent a skin forming. Chill the custard until completely cooled.


5. Once cooled, divide the custard among the chilled pastry cases (you may not need it all, be careful not to over-fill), then top each with a heaped teaspoon of fruit mince (it will sink into the custard, so don't worry). Scatter with the flaked almonds and bake for around 25 minutes or until the pastry is golden and custard is almost set.


6. Cool in the pan for 5 minutes, then place on a rack to cool completely. Dust with icing sugar and serve. These are best eaten the day of baking while the pastry is still crispy.


If there is one recipe you try this Christmas, you must try these festive portugese tarts.. They are simply sublime!


Love,
Ladybird x

Monday, 13 December 2010

Baby Panettone


One of the things I love about food blogging is that you actually end up learning a lot about food along the way. I particularly love learning about festive food from around the world, its history, the way foods evolve along with soceity, and so on. Fascinating stuff (well.. for me anyway!). I had one of these warm and fuzzy moments when reading an article about panettone recently. It was so lovely to read about its origins and how significant it is to Italians at this time of year. Food really does bring people together, which I think is one of the nicest things about Christmas. So, even though I am not Italian, I decided I wanted in on this panettone business!

So what is panettone? Panettone is a traditional Italian bread with a domed top enjoyed around Christmas. It is a lovely buttery and lightly sweetened bread dotted with dried fruit such as raisins and candied citron. It is said to have originated in Milan, and is commonly enjoyed warm or lightly toasted along with (and even dunked into) espresso at breakfast.


Although it takes a little time to wait for the dough to rise (I definitely do not recommend attempting to make this on a weekday after work), here is a recipe to make your own baby size panettone. I'm a sucker for anything miniature, aren't you?! To make this recipe, you'll need 8 empty, clean, regular-size cans. I only had 4, so I actually halved the recipe below.


Baby Panettone
Adapted recipe from 200 Christmas Recipes by Hamlyn

2 tsp easy-blend dried yeast
125g caster sugar, plus 1 tsp
175ml hand-hot milk
700g strong bread flour (available in the baking aisle of most supermarkets)
4 large eggs, plus 2 yolks
2 tsp vanilla extract
zest of 2 lemons
175 salted butter, very soft and diced
185g mixed dried fruit

1. Grease 8 x 400ml clean food cans and line with greaseproof paper that extends above the rims. Grease the paper.

2. Stir the yeast and 1 teaspoon sugar into the milk in a large, warm bowl and leave for 10 minutes or until frothy. Stir in 100g of the flour. Cover with clingfilm and leave for 30 minutes.

3. Add the eggs and egg yolks, the remaining flour and the sugar, vanilla, zest and butter. Mix with a round-bladed knife to make a soft dough, adding a little more flour if the dough feels sticky. Turn out onto a lightly floured surface and knead until smooth and elastic. Leave to rise in a lightly greased bowl, covered with clingfilm, for 2-4 hours or until doubled in size.


4. Knock back the dough and lightly knead in the dried fruit. Cut the dough into 8 pieces and drop into the tins. Cover and leave to rise until the dough reaches the can rims.


5. Bake in a preheated oven at 200 degrees celsius (Gas Mark 6) for 20-25 minutes or until risen and golden. Remove from oven and leave in cans for 5 minutes before shaking out the panettone to cool on a wire rack.


Variation
To make a whole panettone instead of 8 baby ones, shape the mixture into 1 large ball. Place in a 15cm round cake tin, greased and lined with a double layer of greased greaseproof paper that extends 10cm above the rim. Cover and leave to rise. Bake for 15 minutes at 200 degrees celcius, then reduce to 180 degrees celcius and bake for 40 minutes until well risen and an inserted skewer comes out clean. Leave in tin for 10 minutes, then cool on a wire rack.

Enjoy at home, or wrap well with clingfilm, add some festive decorations and give away to family/friends!


Ladybird x

Sunday, 12 December 2010

Lime & Passionfruit Curd


If you are not already sold by the title of this post, I must preface this recipe by telling you (rather unashamedly) how absolutely gorgeous it is to eat... The lime and passionfruit make this a wonderfully fresh and flavoursome curd that's like summer on a spoon. It is very easy to make, and would make a wonderful edible gift for a loved one. Stored in a jar with an airtight lid, this curd will keep in the fridge for up to 1 month.


There are many uses for a lovely curd like this... Here are are just a few ideas to get you drooling...
  • Served with pancakes
  • Injected into vanilla cupcakes with a piping tip
  • Paired with whipped cream to sandwich a sponge cake together
  •  Drizzled over ice cream
  • Served with a citrusy cheesecake

But enough with the hyperbole, where's the recipe already?!

Lime & Passionfruit Curd
Adapted recipe from 200 Christmas Recipes by Hamlyn
(makes around 2 1/4 cups quantity)

Ingredients
250g caster sugar
zest and juice of 4 limes, kept aside in separate bowls
125 unsalted butter, cut into pieces
4 eggs, beaten and strained
3 passionfuits

Method
1. Place a heatproof bowl over a saucepan of simmering water, making sure that the bowl is not touching the water. Place the sugar and zest in the bowl and press them against the edge of the bowl with a spoon to release the oils from the zest.


2. Pour the lime juice into the bowl through a sieve and add the butter. Heat, stirring occasionally, until the butter has melted.


3. Whisk the eggs into the mixture and then switch back to the wooden spoon and stir constantly to avoid curdling. Continue stirring over low heat for approximately 20-25 minutes until the curd lightly coats the back of the wooden spoon.

4. Remove the bowl from the heat and cool slightly before stirring through the passionfruit pulp.

5. Transfer to warm, sterilised jars*. Cover each jar with a disc of waxed paper, placed waxed side down. Allow to cool, then close the jars with their lids.

* How to sterilise jars
I have often wondered what this actually entails, but as it turns out, it's relatively simple! To sterilise jars wash them either in the dishwasher or in hot soapy water. Rinse and dry them in the oven on the lowest setting for 15 minutes. Fill the jars while still warm.

Note
The curd will thicken with refrigeration, but if you wish to thin it out again for use simply warm slightly.


Till next time, dear readers!

Ladybird x
Related Posts with Thumbnails